32
9 TROUBLESHOOTING
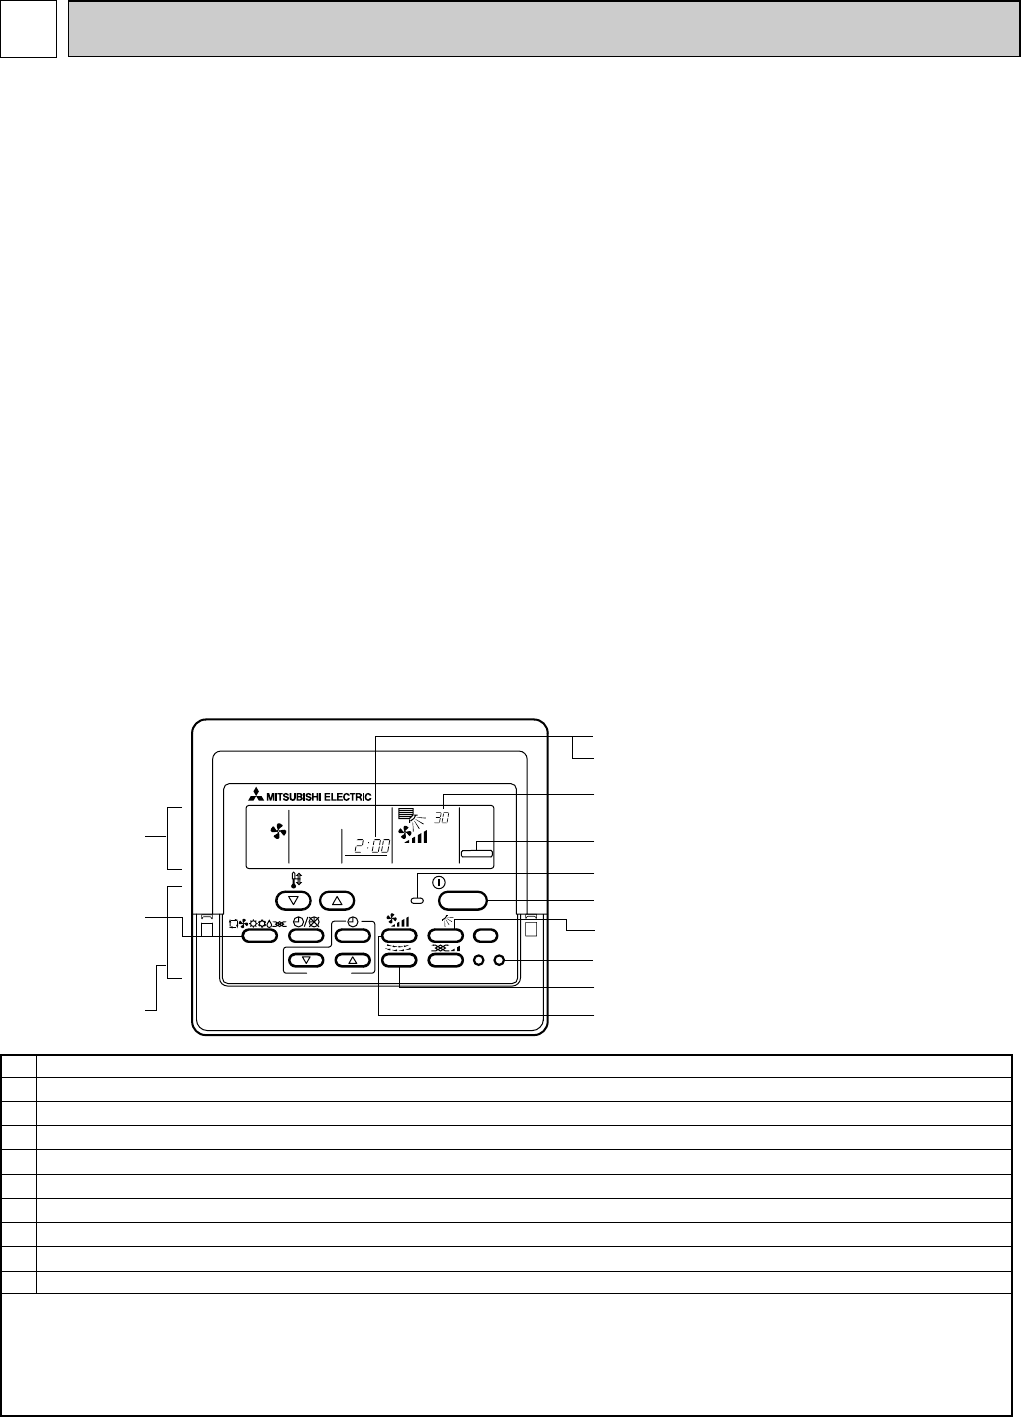
Operation procedure
1 Turn on the main power supply of all units at least 12 hours before test run. ”HO” appears on display panel for 3 min.
2 12 hours later, press TEST RUN button twice to perform test run. “TEST RUN “ appears on display panel.
3 Press OPERATION SWITCH button to make sure that air blows out.
4 Select Cooling (or Heating) by OPERATION SWITCH button to make sure that cool (or warm) air blow out.
5 Press Fan speed button to make sure that fan speed is changed by the button.
6 Press AIR DIRECTION button or LOUVER button to make sure that air direction is adjustable(horizontal, downward, upward, and each angle).
7 Check outdoor fans for normal operation.
8 Check interlocked devices (like ventilator) for normal operation, if any. This is the end of test run operation.
9 Press ON/OFF button to stop and cancel test run.
NOTE 1 : If error code appears on remote controller or remote controller malfunction , refer to “ 9-1-3. Countermeasures for Error During Run”.
NOTE 2 : During test run operation 2-hours off timer activates automatically and remaining time is on remote controller and test run stops 2-hours
later.
NOTE 3 : During test run, the indoor liquid pipe temperature is displayed on remote controller instead of room temperature.
NOTE 4 : Depend on a model, “This function is not available” appears when air direction button is pressed. However, this is not malfunction.
9-1. CHECK POINTS FOR TEST RUN
9-1-1. Procedures of test run
(1) Before test run, make sure that following work is completed.
• Installation related :
Make sure that the panel of cassette type and electrical wiring is done.
Otherwise electrical functions like auto vane will not operate normally.
• Piping related :
Perform leakage test of refrigerant and drain piping.
Make sure that all joints are perfectly insulated.
Check stop valves on both liquid and gas side for full open.
• Electrical wiring related :
Check ground wire, transmission cable, remote controller cable, and power supply cable for secure connection.
Make sure that all switch settings of address or adjustments for special specification systems are correctly settled.
(2) Safety check :
With the insulation tester of 500V, inspect the insulation resistance.
Do not touch the transmission cable and remote controller cable with the tester.
The resistance should be over 1.0 MΩ. Do not proceed inspection if the resistance is under 1.0 MΩ.
Inspect between the outdoor unit power supply terminal block and ground first, metallic parts like refrigerant pipes or the electrical box next,
then inspect all electrical wiring of outdoor unit, indoor unit, and all linked equipment .
(3) Before operation :
a) Turn the power supply switch of the outdoor unit on for compressor protection. For a test run, wait at least 12 hours from this point.
b) Register control systems into remote controller(s). Never touch the on/ off switch of the remote controller(s). Refer to 9-1-2. Special
Function Operation and Settings (for M-NET Remote Controller), this registration is unnecessary.
(4) More than 12 hours later from power supply to the outdoor unit, turn all power switch on for test run. Perform test run according to the
“Operation procedure” table of the bottom of this page. While test running, make test run reports .
(5) When you deliver the unit after test run, instruct the end user for proper usage of the system using owners’ manual and the test run report
you made to certificate normal operation. If abnormalities are detected during test run, refer to “ 9-1-3. Countermeasures for Error During
Test Run”. As for DIP switch setting of outdoor unit, refer to” 9-5. INTERNAL SWITCH FUNCTION TABLE”.
ON/OFF
TEST RUN
˚C
1Hr.
FILTER
CHECK TEST
TEMP.
TIMER SET
Check code indicator (see NOTE 1)
Test run remaining time indicator (see NOTE 3)
Display panel
(M-NET Remote controller)
ON/OFF button 9
ON/OFF LED (Lights up in operation)
LOUVER button 6
TEST RUN button 2
AIR DIRECTION button 6
FAN SPEED button 5
TEST RUN indicator
Indoor unit liquid pipe temperature indicator
(see NOTE 4)
(Cooling/Heating)
OPERATION
SWITCH button
3,4
Control panel
OC376B--2.qxp 08.1.17 1:15 PM Page 32


