


Adding Expansion Devices 4-11
Removing a SO-DIMM Module
If you need to remove a SO-DIMM module, use the following steps.
To prevent damage to system components and
the memory modules, wake a system in sleep mode, exit Windows, power
down the system, and unplug the AC adapter power cord from the power
source.
1.
If your system is in sleep mode, move the mouse or press a key to
take it out of sleep mode.
2.
Save and exit all your open applications and shut down Windows.
3.
Shut down the system by pressing and holding in the power button
for four seconds or more.
4.
Unplug the AC adapter power cord from the power source.
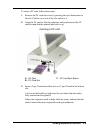
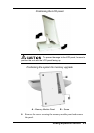
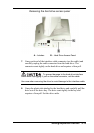
To prevent damage to the LCD panel, position
the system as shown in the figure “Positioning the system for memory
upgrade” in the previous section.
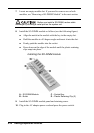
5.
On the bottom of the system unit, remove the screw fastening the
module panel to the unit. Remove the panel (see the figure
“Positioning the system for memory upgrade” in the previous
section).
6.
Locate the module that you want to remove.
7.
Eject the module by pressing the plastic retaining clips at the outer
edges of the socket away from the memory module.
8.
If you are installing a module, see “Installing a SO-DIMM Module.”
9.
Install the SO-DIMM module panel and retaining screw.
10.
Plug in the AC adapter power cord and press the power switch on the
system unit.