


4-14 Adding Expansion Devices
Installing a Hard Drive
Install a hard drive as follows.
1.
Remove the installed hard drive (see “Removing a Hard Drive”
earlier in this chapter).
2.
Check that the interface cable is out of the way and not behind the
system cover.
To prevent damage to the pins on the hard drive
connector when seating the drive, press in on the sides of the connector
and not on the pin area.
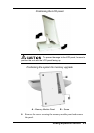
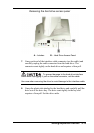
3.
Align the drive, tab side up, in front of the bay and start it into the
bay. Firmly press in on the sides of the drive (not the pins) until the
drive is fully seated in the bay.
To prevent damage to the pins on the hard drive
connector when connecting the interface cable, carefully align the cable
connector with the two rows of pins on the left side of the hard drive
connector. Do not plug into the four pins on the right side of the drive
connector.
4.
Align the interface cable connector with the pins on the drive
connector and carefully plug in the connector. Use care to avoid
positioning the connector over the four pins on the right side of the
connector.
5.
Push the hard drive plastic tab inside the system unit cover.
6.
Install the tabs on the bottom of the access panel into the
corresponding slots on the system unit. Press the panel in until it
snaps in place.
7.
Plug in the AC adapter power cord and press the power switch.