


55
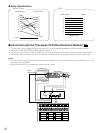
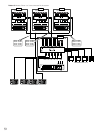
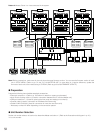
● Connection with the PC
Connect the PC and the Master unit. (Refer to p. 48 for the
connection procedure.)
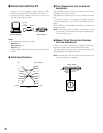
● Software Setup
After connecting the PC to the Master unit, do the setup
procedure with SETUP MENU or WJ-SX150A Administrator
Console.
• With SETUP MENU
1. Turn the power of each unit to ON.
2. Log-in the system with a system controller. (Refer to p.
104.)
3. Open SETUP MENU. (Refer to p. 63.)
4. Open “700 SYSTEM” - “710 MASTER-SLAVE”. (Refer to
pp. 72 and 73.)
5. Set the connected Slave units to ON. “Is the MASTER-
SLAVE changed? NO” will appear.
6. Change NO to YES by pressing the NEXT or PREV but-
ton on the system controller.
7. Press the SET button. The setting will be saved and you
will log-out from SETUP menu.
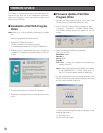
• With WJ-SX150A Administrator Console
1. Turn the power of each unit to ON.
2. Open WJ-SX150A Administrator Console. (Refer to p.
80.)
3. Open the Master-Slave window. (Refer to p. 81.)
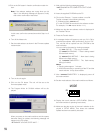
4. Configure and save the settings by clicking on the Save
Exit button. (Refer to p. 82.)
5. Open the “Put a file to SX150A” window. (Refer to p.
83.)
6. Click on the “OK” button. The setting data will be trans-
ferred to the Master unit.
7. Close the main window (refer to p. 80) to quit WJ-
SX150A Administrator Console.
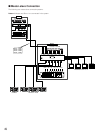
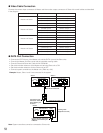
● Recorder Setup
When connecting a recorder with more than one video
input (WJ-HD500 or WJ-HD200 Series), conform the LCN
(logical camera number) settings of the unit to the camera
number setting of a recorder. (Refer to pp. 73/82 and the
recorder’s operating instructions.)