22
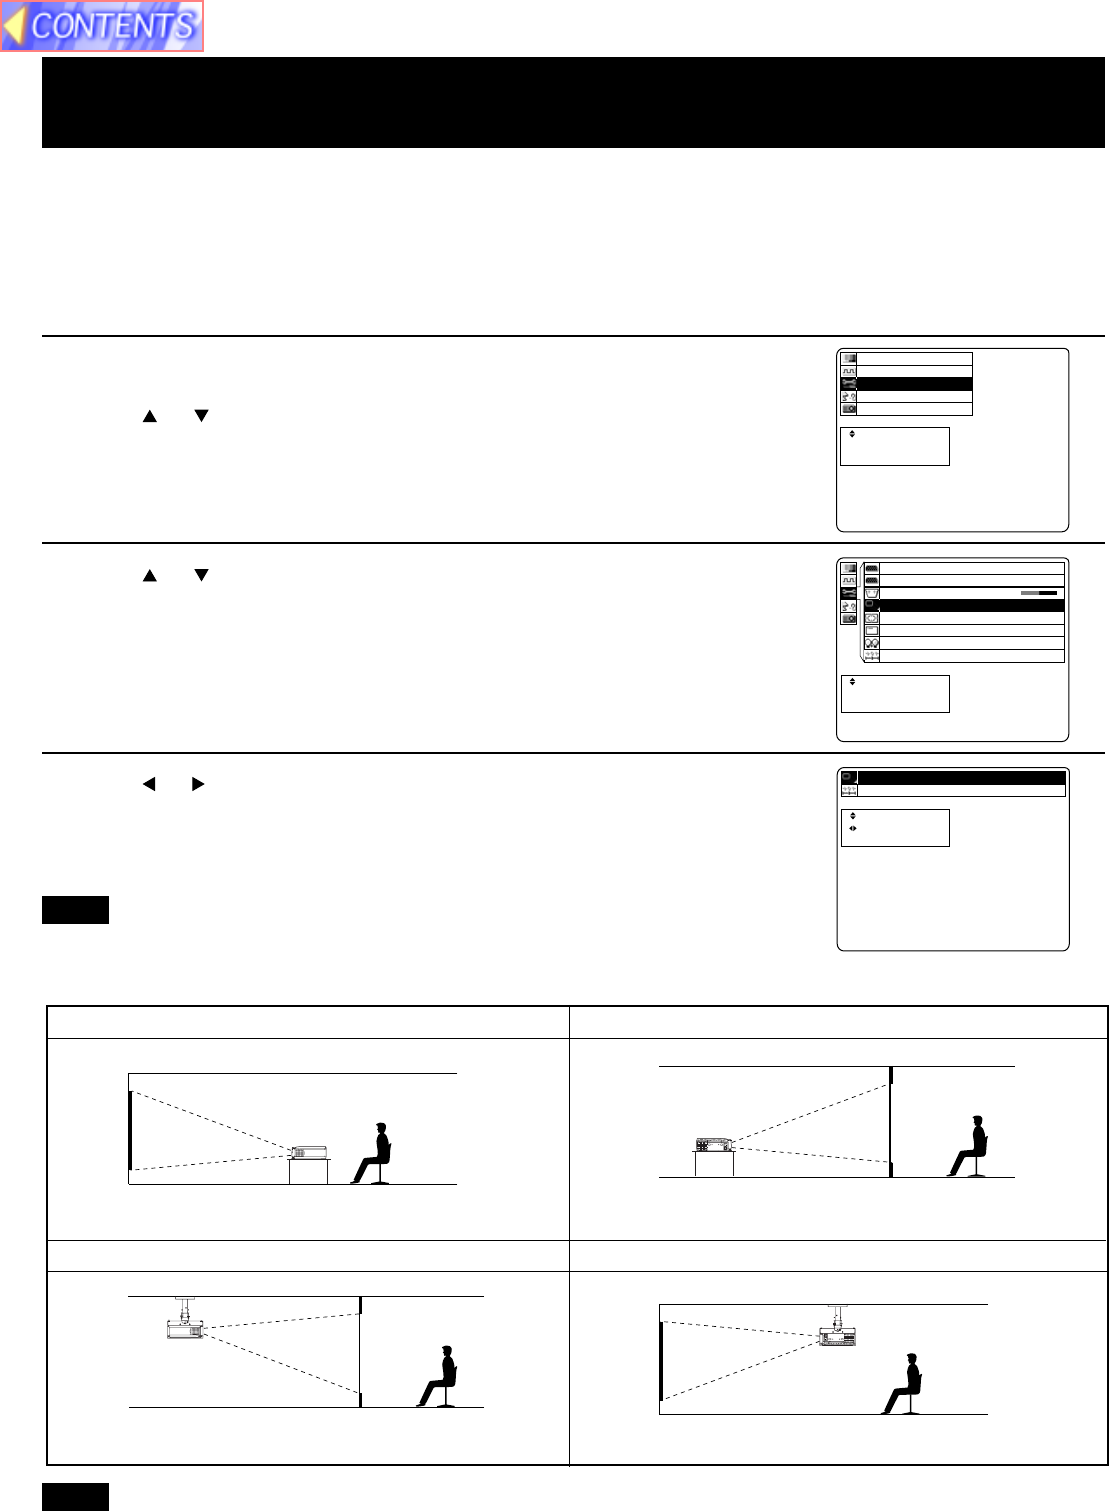
Setting-up Positions and Changing the Projection Mode
The projection mode used by the Projector can be changed in accordance with the setting-up position. Including ceiling
mounting, you may select from four direction types. At the time of shipment from the factory, the Projector is set to the
No.1 “DESK/FRONT” projection mode, but this can be changed if required.
The procedure and on-screen display as shown below are based on RGB as the input signal from a personal computer.
(See page 17.)
• If the lettering on the screen is projected backwards or upside down, it is because the wrong mode has been selected.
• Setting procedure
t
e
c
r
p
e
e
a
l
t
c
e
n
s
S
E
E
:
:
:
R
E
U
T
N
N
E
E
M
n
o
i
t
a
n
z
o
i
i
n
n
e
t
e
o
o
g
a
r
r
i
a
m
u
h
t
u
r
t
c
c
g
o
c
n
n
n
f
i
y
u
a
n
P
S
F
L
I
t
t
e
c
s
p
e
u
a
l
j
c
e
d
s
S
A
E
:
:
:
U
N
E
M
1 edoM noitcejorP
teseR
1 Press MENU to display the menu.
2 Press or to select “Function”, and then ENTER to display the
screen.
3 Press or to select “Projection Mode”, and then ENTER to
display the screen.
4 Press or to select projecting mode from 1 to 4.
• Select 1 .....DESK/FRONT (Factory setting)
• Select 2 .....DESK/REAR (Right and Left displays in reverse)
• Select 3 .....CEILING/REAR (Up and Down displays in reverse)
• Select 4 .....CEILING/FRONT (Up and Down/Right and Left reverse display.)
• Press MENU to remove the setup screen and menu.
• When reset is selected, adjustment values return to their factory default settings.
(Factory setting)
Select 1 ......DESK/FRONT Select 2 ......DESK/REAR
Select 3 ......CEILING/REAR Select 4 ......CEILING/FRONT
(Right and Left displays in reverse)
(Up and Down displays in reverse) (Up and Down/Right and Left reverse display)
Note
Note
t
e
c
r
p
e
e
a
l
t
c
e
n
s
S
E
E
:
:
:
R
E
U
T
N
N
E
E
M
1
T
1
6
N
S
B
U
.
O
E
G
O
0
Y
R
x
0
1
y
T
+
a
U
e
l
O
d
p
o
s
f
1
M
i
f
B
n
D
O
G
n
o
R
o
i
n
p
/
e
i
s
e
m
P
N
n
t
s
e
a
Y
I
o
c
e
r
L
/
t
e
r
c
t
1
2
s
j
p
S
o
e
B
B
y
o
m
t
s
G
G
e
r
o
n
u
e
R
R
K
P
C
O
A
R
R
P
B
