


Introduction 20
Model 2616RC T-DAC User Manual 2 • Hardware installation
Introduction
This chapter contains the following procedures for installing the Model 2616RC T-DAC:
Note
Before installing the T-DAC, you will need to obtain the line type and
encoding of the T1/E1 line from your local telephone company (Telco).
• “Unpacking the Model 2616RC T-DAC”—lists the contents in the T-DAC shipping container
• “T-DAC blades installation”—describes installing the T-DAC on a flat surface or in a standard 19-inch
rack
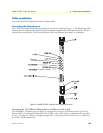
• “Cable installation” on page 22—describes installing the power and network interface cables
• “Completing the hardware installation” on page 30—describes testing the T-DAC hardware to verify that it
is ready for software configuration
Unpacking the Model 2616RC T-DAC
Inspect the shipping carton for external damage. Note any damage before removing the container contents.
Report equipment damage to the shipping carrier immediately for claim purposes. Save all packing materials in
case you need to return an item to the factory for servicing.
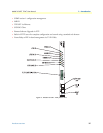
The T-DAC comes with the following items:
• The Model 2616RC Digital Cross-Connect (T-DAC)
• One RJ45-to-RJ45 cable for use with the console and Ethernet ports
• A DB9-RJ45 (EIA-561) adapter for connecting a PC's serial port to the T-DAC console port
• Model 2616RC T-DAC User Manual
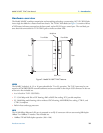
T-DAC blades installation
Do the following:
Note
Verify that the rack chassis is properly grounded before installing the
T-DAC blades. An adequate ground can be achieved by connecting a
#10 AWG ground wire between the rack chassis grounding stud and
one of the following ground sources:
•
The building ground rod (generally located at the site’s main ser-
vice entrance)
•
A sprinkler system pipe
•
A cold-water pipe
•
Building structural steel
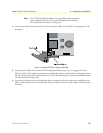
1. If you have not done so already, remove the T-DAC from its shipping container.
Note
Be sure to wear the anti-static strap to prevent electrostatic damage to
the blade.