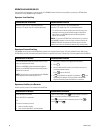
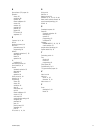
C1522M-C (2/05) 41
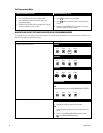
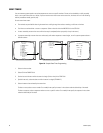
In the AUX field, select an auxiliary to be activated.
GON = turn global auxiliary on
GOFF = turn global auxiliary off
CON = turn camera auxiliary on
COFF = turn camera auxiliary off
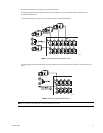
NOTE: Activate the auxiliaries on the rear panel of the CM6800 by selecting global auxiliary numbers 1 or 2. The remaining
global auxiliary numbers control auxiliaries in up to two REL2064 Relay Interface Units.
4. In the GROUP ENABLE field, select ÒYÓ under the appropriate group letter to assign the alarm contact to one or more alarm groups.
Refer to the Program Alarm Groups section for information on alarm group display options.
NOTE: Verify that the monitor specified by the alarm group has access to the camera view(s) triggered by this alarm. If an alarm is
cued to a monitor that does not have access to the appropriate cameras, the camera views cannot be monitored.
5. Optional: The remaining alarm contact fields are configured with factory default settings; customize your system as necessary, by
changing the following settings:
ACK TYPE: The alarm clearance type is set to MANUAL by default, requiring an operator to acknowledge an alarm from a system
keyboard. If you select AUTO, the alarm will time out automatically after the interval specified in the TIME OUT field.
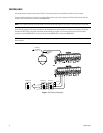
TYPE: Internal alarms are set by factory default as N.O. (normally open). Select N.C. for normally closed operation. Set the external
alarm input type through the ALM2064 Alarm Interface Unit.
PRIORITY: Select 1 for a priority alarm, which appears on system monitors before a non-priority (0) alarm.
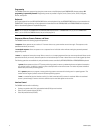
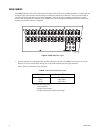
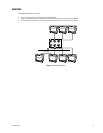
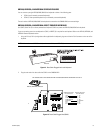
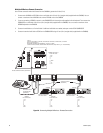
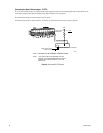
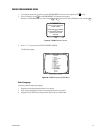
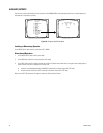
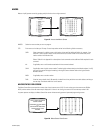
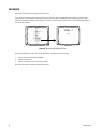
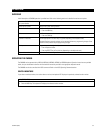
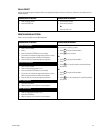
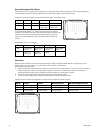
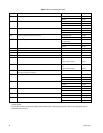
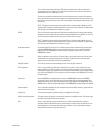
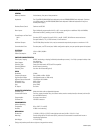
PROGRAM A VIDEO LOSS ALARM
Use the Video Loss screen to program the CM6800 to detect video loss from any camera input and indicate the loss through alarm mode –
the logical alarm number, the alarm icon and a “V” (for video loss) appear on system monitors as specified by alarm group assignment.
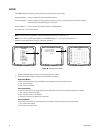
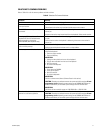
Figure 32. Program Video Loss Alarms
1. Select the PHYSICAL INPUT number; the logical camera number associated with the physical input appears in the CAMERA field.
2. Select ON in the ENABLE field.
3. In the GROUP ENABLE field, select “Y” under the appropriate group letter to assign the alarm contact to one or more alarm groups.
Refer to the
Program Alarm Groups
section for information on alarm group display options.
4. Optional: The ACK TYPE (alarm clearance type) field is set to MANUAL by default, requiring an operator to acknowledge a video
loss alarm from a system keyboard. If you select AUTO, the alarm will time out automatically after the interval specified in the TIME
OUT field.
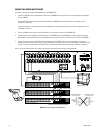
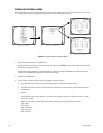
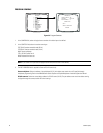
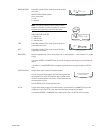
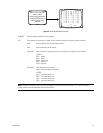
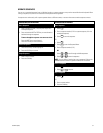
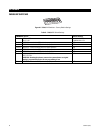
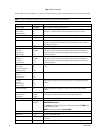
PELCO SWITCHER
MODEL CM6800
MAIN MENU
1 CAMERA
2 LOGICAL CAMERA
3 MONITOR
4 ACCESS
5 TIME & DATE
6 PORT
7 PRIORITY
8 SEQUENCE
9 MACRO
10 ALARM CONTACTS
11 EVENT TIMER
12 SET AUXILIARY
13 SET PASSWORD
14 ABOUT CM6800
ENGLISH
RETURN
00654
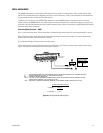
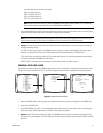
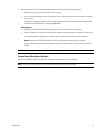
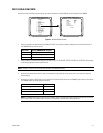
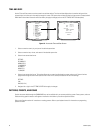
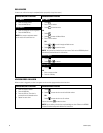
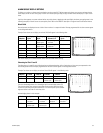
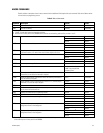
ALARM CONTACTS
1 INTERNAL CONTACT
2 EXTERNAL CONTACT
3VIDEO LOSS
4 ALARM GROUP
RETURN
00642
VIDEO LOSS MENU
PHYSICAL INPUT:
ENABLE: OFF
ACK TYPE: MANUAL TIME OUT: 10
CAMERA 0001
GROUP ENABLE
ABCDEF
NNNNNN
RETURN
00663