


Getting Started 47
Setting Up the Network
z TruePort (Virtual COM Port)—Allows a networked system to communicate with your serial
device through a virtual COM or TTY port, using the Perle TruePort software.
z TCP Sockets (Raw TCP)—Allows hosts on the network to communicate with a serial device
that requires raw data throughput (such as a printer or card reader) connected to the IOLAN
serial port.
z Terminal—Allows a terminal device to connect to a specified host on the network through a
serial port on the IOLAN.
z Printer—(SDS/STS/SCS only) Allows hosts on the network to talk to a printer using LPD
connected to the IOLAN.
z Serial Tunneling—Allows IOLANs on the network to establish a virtual link between their
serial ports. Typically, one IOLAN’s serial port is configured as a Tunnel Server and the other
IOLAN’s serial port is configured as a Tunnel Client.
Setting Up the Network
The most important part of setting up the network is assigning an IP address to the IOLAN, whether
this is a static IP address or enabling a DHCP/BOOTP-assigned IP address. You should also assign a
name to the IOLAN, to make it easier to recognize. This section deals primarily with setting the IP
address.
Using DeviceManager
To use the DeviceManager, you must first install it on a Windows
®
operating system. The
DeviceManager is able to automatically discover all IOLANs on your local network, even if they
have not yet been assigned an IP address. If routers on the network have been setup to propagate
multicasts, DeviceManager will also be able to discover IOLANs in other networks. The
DeviceManager installation wizard can be found on the CD-ROM included in the IOLAN package.
1. Connect the IOLAN to the network.
2. Power on the IOLAN.
3. From the CD-ROM that was included in the IOLAN packaging, select the DeviceManager link.
4. Click on the link under Location and click Open to automatically start the DeviceManager
installation.
5. Install the DeviceManager by following the installation wizard. On the last window, check the
Yes, I want to launch DeviceManager now. box and click the Finish button.
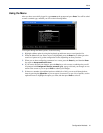
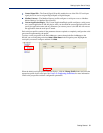
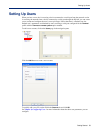
6. When you launch the DeviceManager, it will automatically scan the local network and display
any IOLANs that it can find.
7. Any IOLAN that does not have an IP address will be displayed as Not Configured, with the
Model and MAC Address to identify the IOLAN. Highlight the IOLAN that you want to assign
an IP address to and click the
Assign IP button.
8. Choose the method you want to use to assign an IP address to the IOLAN:
z Type in the IP address that you want to assign to this IOLAN.
z Enable the Have the IOLAN automatically get a temporary IP address option. This will
turn on DHCP/BOOTP, so the IOLAN will attempt to get its IP address from your
DHCP/BOOTP server. If you don’t have a DHCP/BOOTP server, DeviceManager will
temporarily assign an IP address in the range of
169.254.0.1-169.254.255.255 that will
be used only for the duration of the DeviceManager/IOLAN communication.
Click the Assign IP button.
9. You are now ready to configure the IOLAN. Double-click the IOLAN you just configured the IP
address for to open a configuration session. Type
superuser (the factory default Admin user
password) in the Login window and click
OK.