


29
En
PICTURE/SCREEN Adjustment
English
PICTURE/SCREEN Adjustment
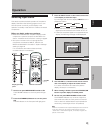
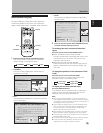
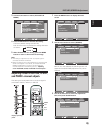
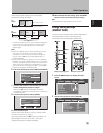
3 Use the 5/∞ buttons to select [AUTO SET UP
MODE].
MENU INPUT1
:
:
ENERGY SAVE
SCREEN MGT.
:
OFF
:
ORBITER OFF
:
MASK CONTROL ON
:
AUTO SET UP MODE INACTIVE
:
AUTO FUNCTION OFF
:
AUDIO OUT FIXED
STANDARD
LANGUAGE ENGLISH
CHANGE EXIT
PICTURE SCREEN SETUP OPTION
4 Press the SET button to activate the setting.
The factory default setting is [INACTIVE].
Each time the button is pressed, the setting alternates
as follows:
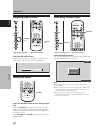
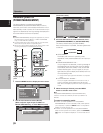
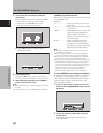
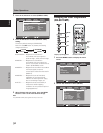
5 When finished with the setting, press the MENU
button to return to the normal screen image.
Notes
÷ This setting is supported only when a computer signal is
connected to INPUT1 or INPUT5.
÷ Optimum settings may not be possible for low-luminance and
certain other signals. In such cases, set the [AUTO SETUP
MODE] to [INACTIVE], and use the manual adjustment
methods explained in the following section, “Adjusting
screen POSITION, CLOCK, and PHASE <manual adjust>“.
3 INACTIVE
ACTIVE 2
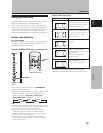
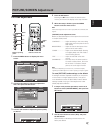
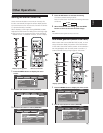
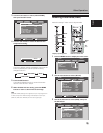
Adjusting screen POSITION, CLOCK,
and PHASE
<manual adjust>
This setting can be adjusted when a computer signal is
connected to INPUT1, INPUT2, or INPUT5.
MENU
2/3
5/∞
SET
MENU
5/∞
SET
2/3
Display operating
panel
Remote control unit
1 Press the MENU button to display the menu
screen.
MENU INPUT1
PICTURE SCREEN SETUP OPTION
CONTRAST
BRIGHTNESS
COLOR
TINT
SHARPNESS
PICTURE RESET
ENTER
SET
EXIT
MENU
:
0
:
0
:
0
:
0
:
0
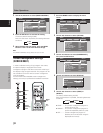
2 Use the 2/3 buttons to select [SCREEN].
:
0
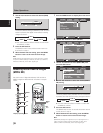
POSITION
CLOCK
:
0
PHASE
:
00
/
SCREEN RESET
MENU INPUT1
PICTURE SCREEN SETUP OPTION
ENTER EXIT
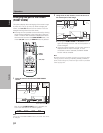
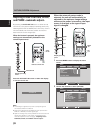
INPUT2, 3 or 4 is selected, the following screen will
appear and the [POSITION] adjustment only can be
selected.
POSITION
:
00
/
SCREEN RESET
MENU INPUT2
PICTURE SCREEN SETUP OPTION
ENTER EXIT
3 Use the 5/∞ buttons to select the adjustment
item, then press the SET button.
:
0
POSITION
CLOCK
:
0
PHASE
:
00
/
SCREEN RESET
MENU INPUT1
PICTURE SCREEN SETUP OPTION
ENTER EXIT