


23
INSTALLATION AND ASSEMBLY
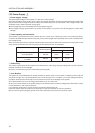
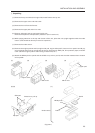
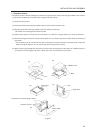
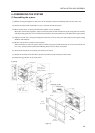
3 Unpacking
[1] Remove the top and side (the longer side) wood frames one by one.
[2] Remove the upper cover and side cover.
[3] Remove the unit from the frames.
[4] Remove the upper pad and mirror mat.
[5] Remove side pad, and top pad covering the unit.
Remove the tapes for transportation protection. (Six in each unit)
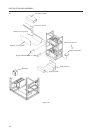
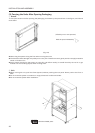
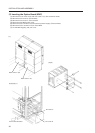
[6] While paying attention to the top and bottom of the unit, place the unit upright together with the under
carton. (This should be done by more than 3 persons.)
[7] Remove the under carton.
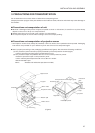
[8] Remove the engine pads A and B, engine side pad, engine side pad F, bottom mirror pads A and B, top
mirror pads A and B, mirror mat (3 each at the top and bottom), MVP pad, lens protector paper, and CRT
cover. (Remove engine pads A and B using a cutter knife, etc.)
[9] Attach the Mickey bolt to pad A and the shield to top mirror pad A, and the other accessories to bottom
mirror pad B.
[1]
[2] [3]
[4]
[5] [6]
(Fig.3-3-1)
Pad A
Mickey bolt
Pad B
Under carton
Top pad
Side pad
Direction to pull up
[7]
Upper pad
Mirror mat
Upper cover
Side cover