


89
ADJUSTMENTS
[3] Adjusting the H SIZE
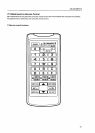
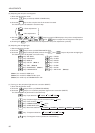
1) Enter the adjustment mode.
2) Press the
3
key to select [3. DEFLECTION ADJ].
3) Press the
5
key to select [H SIZE]. Then use the
2
/
–
and
/
3
+
keys to adjust the H SIZE.
The following can be adjusted using similar methods.
0
key : V STATIC
7
key : H BLK-L
2
key : V SIZE
8
key : H BLK-R
3
key : V MID SIZE
9
key : V MID LINEARITY
5
key : H SIZE
B
key : H PIN
6
key : V LINEARITY
D
key :
GH LINEARITY (is the same as GH LINEARITY in “4. CONVERGENCE ADJ”.)
[4] Adjusting the green horizontal size (GH SIZE)
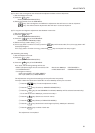
1) Enter the adjustment mode.
2) Press the
4
key to select [4. CONVERGENCE ADJ] .
3) Press the
G
ADJ
ON/OFF
key until the OSD display becomes [GH].
The following can be adjusted in the same way.
R
ADJ
ON/OFF
key : RH RV
B
ADJ
ON/OFF
key : BH BV
4) Press the
2
key until the OSD display becomes [SIZE].
Then use the
2
/
–
and
/
3
+
keys to adjust the GH SIZE.
The following can be adjusted in the same way.
1
key : STATIC
2
key :
3
SIZE
3
MID SIZE
3
5D SIZE
3
key :
3
LINEARITY
3
MID LINEARITY
3
6D LINEARITY
4
key :
3
SKEW
3
3D SKEW
3
5D SKEW
5
key :
3
KEY
3
MID KEY
3
3D KEY
3
MID 3D KEY
6
key :
3
SUB KEY
3
MID SUB KEY
3
3D SUB KEY
3
MID 3D SUB KEY
7
key :
3
BOW
3
4D BOW
3
6D BOW
8
key :
3
PIN
3
MID PIN
3
4D PIN
3
MID 4D PIN
9
key :
3
SUB PIN
3
MID SUB PIN
3
4D SUB PIN
3
MID 4D SUB PIN