


CHAPTER 2: INSTALLATION 7
♦ YES: Enables dynamic IP addressing for UST-IP. Each time UST-IP boots, it requests an
IP address from the local DHCP server. Note that this setting can make remote access to
UST-IP from outside the LAN difficult, since the dynamically assigned IP address must
be known in order to initiate a connection.
♦ NO (default): Assigns a fixed IP address to the UST-IP unit (recommended).
IP Address: Enter the IP address for UST-IP given by your Network
Administrator.
Subnet Mask: Enter a Subnet Mask provided by your Network
Administrator.
Default Gateway: Enter the Default Gateway if your Network Administrator
specifies one.
• Enable Modem Interface: Enables Dial-up Modem access (default: YES). For UST-IP, an external
serial modem must be connected in order for this function to work properly.
• Enable Web Browser Interface: Enables Web browser access to UST-IP (default: YES).
• Use Default TCP Port 5000:
- YES (default): Utilizes the default port 5000.
- NO: Enter an alternate port number.
Note: In order to access UST-IP from beyond a firewall, your firewall settings must enable two-way
communication through the default port 5000 or the non-default port configured above.
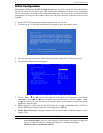
6. Press Ctrl+S to save entries. The Main Menu will appear.
7. On the Main Menu, select [R] Restart or shutdown the UST-IP, and press the Enter key.
8. When prompted, press the letter R on your keyboard to restart UST-IP.
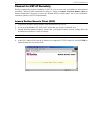
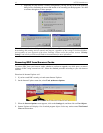
9. UST-IP will restart and the UST-IP Initialization screen appears upon boot up.
10. Congratulations! UST-IP is now ready for initial connection.
Accessing UST-IP Local Admin Port
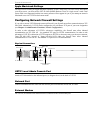
To access the local admin console port from your UST-IP device, use HyperTerminal to configure specific
settings for a PC and at least one additional setting for a laptop computer. Please perform the following
steps:
a. In Windows, click on the Start menu. Click Programs, then click Accessories, click
Communications, and then click HyperTerminal to start a session.
b. Name the session, select a session icon if required, and click OK.
c. In the Connect To window, click on the Connect Using drop-down arrow and select COM1 (or
other option, depending on where your PC's serial cable is connected).
d. Click OK.
e. In the COM1 Properties window, click on the Port Settings tab:
i. Click on the Bits per second drop-down arrow and select 115200.
ii. Click on the Flow control drop-down arrow and select NONE.
iii. Click OK.
f. On the File menu, click Properties, and then click on the Settings tab:
i. Click on the Emulation drop-down arrow and select VT100.
ii. Click ASCII Setup. In the ASCII Setup window, ensure that only the option Wrap lines that
exceed terminal width is checked. If any other options are checked, you may have display
issues.
iii. Click OK.
iv. Click Terminal Setup. In the Terminal Settings window, ensure the option Keypad application
mode is checked (this option must be specified for most laptop computers).
g. Click OK.
h. Click OK.
Proceed to the next section to initiate your first remote connection to UST-IP. After you have become
familiar with the remote operation of UST-IP, consult Chapter 4: Administrative Functions to review the
complete administrative functions provided by UST-IP.