


CHAPTER 4: ADMINISTRATIVE FUNCTIONS 33
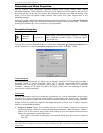
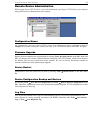
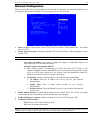
Network Configuration
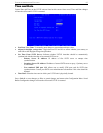
Please note that after you have made changes to the Network Configuration, you must press Ctrl+S to save
your changes. Reboot after all changes are saved to apply them to your Network.
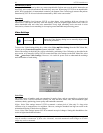
• Name: Designate a unique name for this UST-IP unit, for example, “Miami Data Center.” The default
name is UST-IP.
• Enable Ethernet Interface: Designates whether UST-IP should enable its Ethernet adapter as active
(default: YES).
Note: Network connections must be 10BASE-T or 100BASE-TX Ethernet
- Line Speed & Duplex: Auto detect 10 Mbps/Full Duplex, 10 Mbps/Half Duplex, 100
Mbps/Full Duplex, or 100 Mbps/Half Duplex
- Obtain IP address automatically (DHCP):
♦ YES: Enables dynamic IP addressing for UST-IP. Each time UST-IP boots, it will
request an IP address from the local DHCP server. Note that this setting can make remote
access to UST-IP from outside the LAN difficult, since the dynamically assigned IP
address must be known in order to initiate a connection.
♦ NO (default): Assigns a fixed IP address to the UST-IP unit (recommended).
IP Address: Enter the IP address for UST-IP given by your Network
Administrator.
Subnet Mask: Enter a Subnet Mask provided by your Network
Administrator.
Default Gateway: Enter the Default Gateway if your Network Administrator
specifies one.
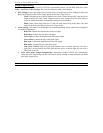
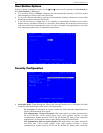
• Enable Modem Interface: Enables Dial-up Modem access (default: YES). For UST-IP, an external
serial modem must be connected in order for this function to work properly.
• Enable Web Browser Interface: Enables web browser access to UST-IP (default: YES).
• Use Default TCP Port 5000:
- YES (default): Utilizes the default port 5000.
- NO: Enter an alternate port number.
Note: In order to access UST-IP from beyond a firewall, your firewall settings must enable two-way
communication through the default port 5000, or the non-default port configured above.