


35
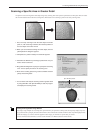
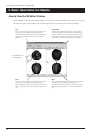
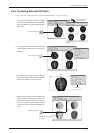
1. First, do a scan of an apple. Then, in Dr. PICZA3,
click the [Run 3D Editor] button. When 3D Editor
starts, the data for the apple is imported at the
same time.
2. Try cutting the apple vertically. Clicking the [Cut
at Plane] button displays the cut surface and a
dialog box.
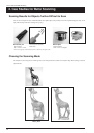
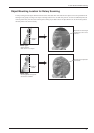
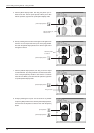
3. Try shifting the cut location a little to one side.
This may be easiest to do in the [Front] window.
Drag the cut surface to move it to the left.
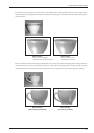
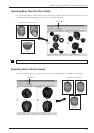
4. When you have decided on the cut location, click
[Run]. The apple is divided into two parts. How-
ever, its still looks like a single object. Try sepa-
rating the two parts. Click the [Select Object]
button, then click the left part of the apple to se-
lect it.
[Run 3D Editor] button
Dr. PICZA3
3D Editor starts and
data is imported.
3D Editor
[Cut at Plane] button
Drag.
[Select Object] button
Click this portion
to select it.
Click this to
make the cut.
Let's Try Editing Data with 3D Editor
Let's try some simple editing. We'll scan an apple with the LPX-250, then try cutting and moving it.
3. Basic Operations for Objects