


1-10 (E)
HDS-X5800
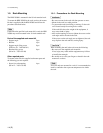
1-6-4. Installation/Removal of Connector
Boards
c
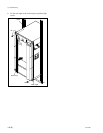
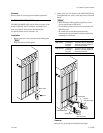
Before installing or removing the boards, be sure to turn
off the power switches and disconnect all of the power
cords (4 cords) from the wall outlet. If the board is at-
tached or removed with the power on, an electric shock
may result or the board may be damaged.
HKS-5810M/5810SD/5860M/5860SD
Installation
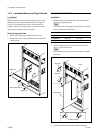
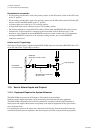
1.
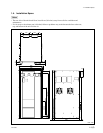
Remove the four screws and remove the two blank panels.
n
Keep the removed blank panels.
B3 x 4
B3 x 4
Blank panel
Blank panel
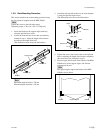
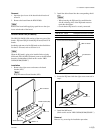
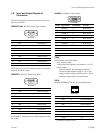
2. Insert the desired board into the corresponding slot and
tighten the two screws (with drop-safe) of the each
board.
m
. Insert the board while applying equal force to the
screws at both ends of the board.
. Check that the boards are securely connected to the
MB-939 board.
. Be careful not to turn them upside down by
observing the top and bottom of these boards when
installing the each board.
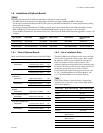
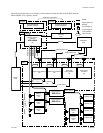
Option name Board Installation slot
name
HKS-5810M CNI-11 The IN1 slot of the same position as
in the HKS-5820M (IPM-98 board)
CNI-12 The IN2 slot of the same position as
in the HKS-5820M (IPM-98 board)
HKS-5810SD CNI-13 The IN1 slot of the same position as
in the HKS-5820M (IPM-98 board)
CNI-14 The IN2 slot of the same position as
in the HKS-5820M (IPM-98 board)
HKS-5860M CNO-13 The OUT1 slot of the same position
as in the HKS-5830M (MX-103 board)
CNO-14 The OUT2 slot of the same position
as in the HKS-5830M (MX-103 board)
HKS-5860SD CNO-15
The OUT1 slot of the same position as
in the HKS-5830SD (MX-104 board)
CNO-16
The OUT2 slot of the same position as
in the HKS-5830SD (MX-104 board)
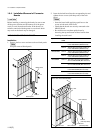
CNI-14 board
CNI-13 board
Screws
(with drop-safe)
Screws
(with drop-safe)
IN 1 slot
(In the case of the HKS-5810SD)
IN 2 slot
1-6. Installation of Optional Boards