


51
Installation and Adjustment
The following remote control units (not supplied) allow you to control the printer
remotely.
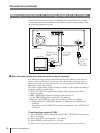
• RM-5500 Remote Control Unit: Used to connect to the REMOTE 1 connector
• RM-91 Remote Control Unit, FS-20/36 Foot Switch: Used to connect to the
REMOTE 2 connector.
The operations to be remotely controlled by the above remote control units depend
on the remote operation settings made with the FUNCTION SETUP menu.
(“Selecting the Operating Mode for Automatic Printing Capabilities” page 65)
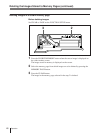
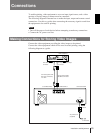
Using the RM-5500 remote control unit (not supplied)
The RM-5500 Remote Control Unit can be used either as a wireless type or wired
type. The buttons on the remote control unit duplicate those on the front panel of
the printer. (see “Front” page 82 and “Sub Panel” page 84)
You can use the remote control unit’s buttons which have the same name as the
one on the printer.
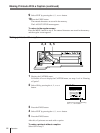
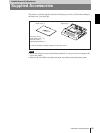
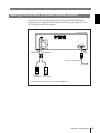
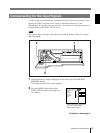
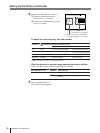
Inserting batteries
Install the batteries in the remote control unit before using it.
1 Remove the battery compartment cover.
2 Insert the two R6 (size AA) 1.5 V batteries.
Note the polarity. Be careful to insert the batteries correctly.
3 Replace the cover.
Battery life
The battery life depends on how much you use the remote control unit. Install fresh
batteries as soon as you notice the unit’s range becoming shorter.
Notes
When using the batteries:
• Remove the batteries from the remote control unit if you do not intend to use it
for an extended period of time. The batteries may leak if you leave them in the
remote control unit.
• Should the batteries leak, clean the battery case thoroughly with a soft cloth and
install fresh batteries.
• Be careful to insert the batteries correctly. Note the polarity, as indicated inside
the battery compartment.
• Replace exhausted batteries with fresh ones. Never mix a fresh battery with a
used battery or with a different kind of battery.
Preparing the Remote Control Unit