


TCP/IP LPR Port Printing Installation
2 7 - 2
DHCP
The print server supports DHCP feature, allowing the print server to obtain an IP address and related TCP/IP
settings automatically from a DHCP server. While the print server supports DHCP, we strongly recommend you
manually specify a fixed IP address to the print server. By default, the print server’s DHCP function is disabled.
Windows NT LPR Port Printing Installation
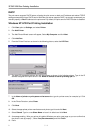
1. Click Start, point to Settings, and select Printer.
2. Run Add Printer.
3. The Add Printer Wizard screen will appear, Select My Computer and click Next.
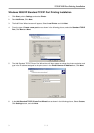
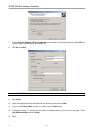
4. Click Add Port.
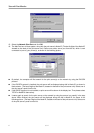
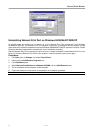
5. From the Printer Ports box as shown in the following picture, select the LPR Port.
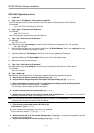
6. The Add LPR compatible printers box will then appear as shown in the following picture. Type in the IP
address assigned to the print server in the Name or address of server providing lpd box.
7. In the Name of printer or print queue on that server box, type in a printer name, for example, lp1. Click
OK.
8. In the Printer Ports box, select Close.
9. Click Next.
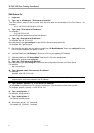
10. Select the appropriate printer manufacturer and printer type list and click Next.
11. Select Shared. Type in a new Share Name or leave it in default and click Next.
12. A message reading, “After your printer is installed, Windows can print a test page so you can confirm that
the printer is set up properly.”, Select Yes (Recommended) and click Finish.
13. Done.