


UMAX Astra 2100U Owner’s Guide
15
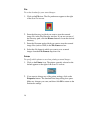
9.
Click the
Preview
button on the right side of the VistaScan
Beginner window and the scanner begins a low-resolution scan.
10.
When the preview scan is complete the preview image is
displayed in the Preview window (on the left side of the
VistaScan window).
You can change the view size of the Preview image before
scanning the final image using the “Zoom Tool,” or select a
region to scan using the “Frame Selection Tool.” To find out
more about how to use these tools, click on the user tips text
that appears when your cursor pauses over the tool.
NOTE:
You must have a browser installed in order to view the
VistaScan online help.
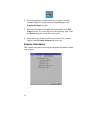
11.
In the
Click to Scan
section of the VistaScan Beginner
window, click the icon that corresponds to the type of image
you are scanning.
For example, if you are scanning a color photograph, choose
“Color Photo.” To scan text or a black and white drawing,
choose “Text/Lineart.” The image is scanned and you return to
the PhotoDeluxe window.
12.
When the scan is complete, a window appears requesting that
you save the document. Type a name in the field that appears to
the right of “Save this document as:”
NOTE:
By default the image is saved as “untitled - #” in the
Acquire
section of the floating gallery window. You can also
choose to save the image in the hard drive or on the desktop by
clicking on the arrow to the right of the My Photos box at the
top of this window.
13.
After a moment the image appears in the My Photos gallery
window. Double-click the thumbnail to view a full-size, high-
resolution scan of the image in the work area.
14.
Exit PhotoDeluxe by selecting
Quit
from the File menu.