


Zebra S400 & S600 User’s Guide 35
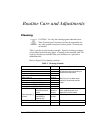
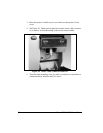
4. Observe the ends of the rear cutter blade guard and note the small
metal pins protruding toward the inside. During the reassembly
procedure, these pins are mounted into the corresponding mounting
slots in the cutter side panels.
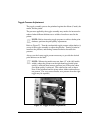
5. To provide complete access to the area to be cleaned, raise the upper
cutter blade guard (c) as shown in Figure 20.
&OHDQLQJWKH&XWWHU0RGXOH
1. Remove any label material that has adhered to the cutter parts and use
a small brush to remove any paper dust from the cutter module.
2. If you use pressure-sensitive media, use a lint-free cloth soaked in an
adhesive remover to remove all gum and label residue from the cutting
blades and guards. If you use tag stock, use alcohol to remove any
dirt.
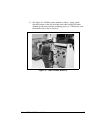
5HDVVHPEOLQJWKH&XWWHU0RGXOH
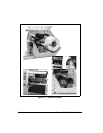
1. See Figure 21. Position the two wire springs (a) down against the
lower cutter blade.
2. Place the rear cutter blade guard (b) over the wire springs,
perpendicular to its final position. Place your thumbs on the top (flat)
part of the guard.
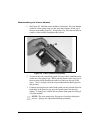
NOTE: Ensure that the ends of the rear cutter blade guard are
positioned on the outside of the cutter side panels.
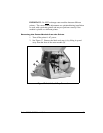
3. Press the rear cutter blade guard down and forward, rotating the guard
as you proceed, to lock the mounting pins (c) into position in the cutter
side panel mounting slots (d). Slide the guard forward until the two
wire spring loops pop up on the back side of the guard.
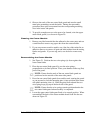
NOTE: Ensure that the wire springs remain positioned under the
rear cutter blade guard when assembly is completed.
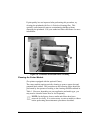
4. Lower the upper cutter blade guard back to its normal position. When
reassembled, the back of the cutter module should look like the one
shown in Figure 22.