


Chapter 8 Application Screens
NSA-220 User’s Guide
110
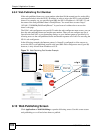
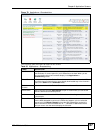
8.16 Print Server Screen
Click Applications > Print Server to open the following screen. Use this screen to view and
manage the NSA’s list of printers and print jobs.
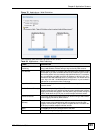
Figure 82 Applications > Print Server
The following table describes the labels in this screen.
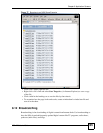
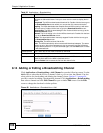
8.17 Print Server Rename
Click Applications > Print Server and a printer’s Rename icon to open the following screen.
Use this screen to change the name the NSA uses for the printer.
Figure 83 Applications > Print Server > Rename
The following table describes the labels in this screen.
Table 32 Applications > Print Server
LABEL DESCRIPTION
Refresh Click Refresh to update the list of printers and print jobs.
The table lists printers and their queued print jobs. Click a column’s heading to sort the
entries by that criteria.
Status This fields shows whether the printer is connected and turned on (on-line) or not (off-
line).
Name This identifies the printer. Each printer connected to the NSA must use a unique name.
Actions Rename: Click this to change the name the NSA uses for the printer.
Cancel Job: Click this to remove all print jobs from the NSA queue for a particular printer.
However, since the NSA sends print jobs to the printer as soon as it can, this button may
only have an effect if there are very large or many print jobs in the queue. To stop a print
job that has already started, you may have to turn off the printer.
Delete: Click this to remove a printer from the NSA’s printer list. To add the printer back
into the list, disconnect the printer from the NSA’s USB port and reconnect it. If that does
not work, disconnect the USB port and turn off the printer’s power. Then reconnect the
printer and turn it back on.
Table 33 Applications > Print Server > Rename
LABEL DESCRIPTION
Name Type a new name to identify the printer. The name must be unique from all the other names
of printers connected to the NSA.