


Chapter 2 Hardware Installation
Hardware Installation
2-5
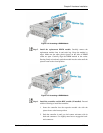
One (1) LCD keypad panel on the left side foldable handle
Back-end PCBs
2.6. Memory Module Installation
2.6.1 Memory Module Installation Overview
The subsystem comes with a pre-installed 512MB DDR RAM DIMM module on each
controller. The controller supports memory modules with sizes up to 2GB. If memory
modules with a different size need to be used, the pre-installed DIMM module can be
removed and the new ones installed. Replacement and installation instructions are
described fully below.
NOTE:
A DIMM of a different size can be ordered from your subsystem supplier. Using
non-certified modules can cause unexpected compatibility problems.
Considerations:
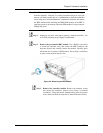
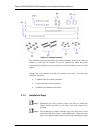
1. A DIMM socket is located on the side of the controller main board. Prior to changing
the DIMM module, the controller canister must first be removed from the enclosure
chassis.
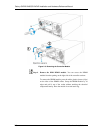
2. With a new subsystem, there may not be cached data in the DIMM module. If the
subsystem has been operating and there is cached data, the BBU will discharge to
support the cache contents. It is therefore recommended to make sure BBU module
is removed before replacing the DIMM module. The BBU can be removed simply by
loosening its retention screw.
If you are replacing the memory modules, please refer to the installation procedure
below. If the memory modules do not need to be changed, proceed to Section 2.7.