


Chapter 2 Hardware Installation
Hardware Installation
2-7
3. The BBU module is hot-swappable and can be independently swapped
from the controller. However, as a safety precaution and just in case your
memory still holds cached data, it is recommended to flush the unfinished
writes using the “Controller Shutdown” command in firmware and remove
the BBU module before handling the DDR RAM module. If the BBU is
supplying power to the memory when the DDR module is being removed,
damage may occur.
Step 1. Prepare an anti-static work pad for placing a removed controller. Use
of an ESD grounding strap is highly recommended.
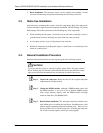
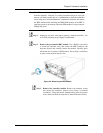
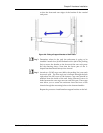
Step 2. Remove the pre-installed BBU module. Use a Phillips screwdriver
to loosen the retention screw that secures the BBU module to the
enclosure chassis and carefully remove the module. Carefully place
the module for it contains Li-ION batteries. Do not drop it to the floor
or place it near any heat source or fire.
Figure 2-2: Removing the BBU Module
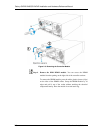
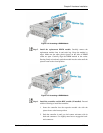
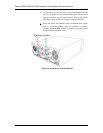
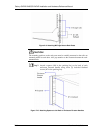
Step 3. Remove the controller module. Remove the retention screws
that secure the controller’s ejection levers using a cross-head
screwdriver. Using both hands, simultaneously press the ejection
levers downward until the controller is removed from the chassis.