


2-2 CHAPTER 2: INSTALLATION AND SETUP
■ Water or moisture cannot enter the case of the unit.
■ Temperature must be within the range of 0 to 40 degrees Celsius.
■ Air-flow around the unit and through the vents in the side of the
case is not restricted. You should provide a minimum of 25mm
(1-inch) clearance.
■ No objects are placed on top of the unit.
■ Units are not stacked more than four high if the Switch is
free-standing.
Configuration Rules
for Gigabit Ethernet
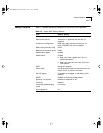
The connectors, supported media types, and maximum distances for
the Switch 9000 are described in Chapter 1.
Installing the
Switch 9000
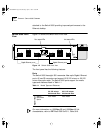
The Switch 9000 can be mounted in a rack, or placed free-standing on
a tabletop.
Rack Mounting The Switch 9000 is 2U high and will fit in most standard 19-inch racks.
The Switch should only be used in a rack if it is mounted on runners, a
shelf, or a tray to support the weight. The rack mount kits alone are
not sufficient to support the weight of the Switch.
CAUTION: The rack mount kits must not be used to suspend the
Switch from under a table or desk, or attach it to a wall.
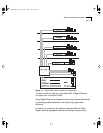
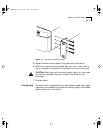
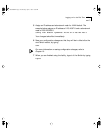
To install the mounting brackets on the Switch, follow these steps:
1 Place the Switch the right way up on a hard flat surface, with the front
facing toward you.
2 Remove the existing screws from the sides of the chassis.
3 Locate a mounting bracket over the mounting holes on one side of the
unit.
4 Insert the four screws and fully tighten with a suitable screwdriver, as
shown in Figure 2-1.
SW9000.BK Page 2 Wednesday, April 1, 1998 11:00 AM