


Installing the Motherboard
User’s Manual
2-5
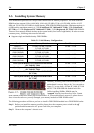
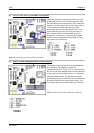
2-2. Installing the Motherboard to the Chassis
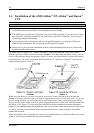
After you install the processor to the motherboard, you can start to fix the motherboard into the chassis.
Most computer chassis will have a base on which there will be many mounting holes that allows the
motherboard to be securely attached and at the same time, prevents short circuits. There are two ways to
attach the motherboard to the base of chassis:
! With studs
! With spacers
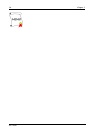
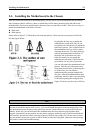
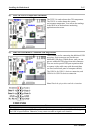
Please refer to figure 2-3, which shows the studs and spacers. There may be several types, but all look
like the figures below:
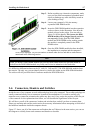
In principle, the best way to attach the
motherboard is with studs. Only if you
are unable to do this should you attach the
board with spacers. Take a careful look at
the motherboard and you will see many
mounting holes on it. Line these holes up
with the mounting holes on the base. If
the holes line up and there are screw
holes this means you can attach the
motherboard with studs. If the holes line
up and there are only slots, this means
you can only attach the motherboard with
spacers. Take the tip of the spacers and
insert them into the slots. After doing this
to all the slots, you can slide the
motherboard into position aligned with
the slots. After the motherboard has been
positioned, check to make sure everything
is OK before putting the casing back on.
Figure 2-4 shows you the way to affix the
motherboard using studs or spacers.
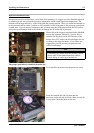
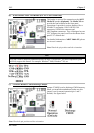
Note
If the motherboard has mounting holes, but they don’t line up with the holes on the base and there are
no slots to attach the spacers, don’t worry, you can still attach the spacers to the mounting holes. Just
cut the bottom portion of spacers (the spacer they may be a little hard to cut, so be careful with your
hands). In this way you can still attach the motherboard to the base without worrying about short
circuits. Sometimes you may need to use the plastic springs to isolate the screw from the motherboard
PCB surface, because the circuit wire may be near by the hole. Be careful, don’t let the screw contact
any the printed circuit wire or parts on the PCB that are near the fixing hole, otherwise it may damage
the board or cause board malfunctioning.