


Installing the Motherboard
User’s Manual
2-17
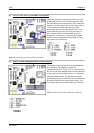
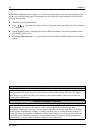
two or four HDDs to get RAID functions, it is very convenient for you to install the HDDs to IDE3, IDE4,
IDE5 or IDE6. See the Chapter 4 for detailed information about RAID settings. (For AT7 Full Version
Only)
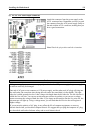
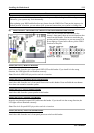
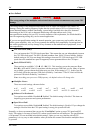
If you want to connect two hard drives together
through one IDE channel, you must configure the
second drive to Slave mode after the first Master
drive. Please refer to the HDD documentation for
jumper settings. The first drive connected to IDE1 is
usually referred to as “Primary Master”, and the
second drive as “Primary Slave”. The first drive
connected to IDE2 is referred to as “Secondary
Master” and the second drive as “Secondary
Slave”.
Keep away from connecting one legacy slow speed
device, like CD-ROM, together with another hard
drive on the same IDE channel, this will decrease
your integral system performance.
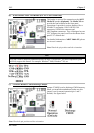
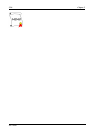
Figure 2-8. Ultra DMA 66
Ribbon Cable Outline
Note
! The Master or Slave status of the hard disk drive is set on the hard disk itself. Please refer to the
hard disk drive user’s manual.
! To connect Ultra DMA 100 & Ultra DMA 133 devices on IDE1 to IDE6, an Ultra DMA 66 cable
is required.
! A red mark on a wire typically designates the location of pin 1. You need to align the wire pin 1 to
the IDE connector pin 1, before inserting the wire connector into the IDE connector.
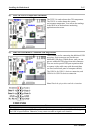
! HPT 374 IDE controller is designed to support high-speed and high performance mass storage
devices. Thus, we suggest that you don’t connect non-disk devices that use ATA/ATAPI
interfaces, such as a CD-ROM, to HPT 374 IDE connector (IDE3 ~ IDE6). (AT7 Full Version
Only)