


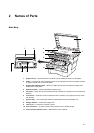
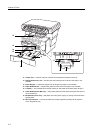

Names of Parts
2-5
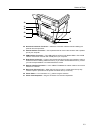
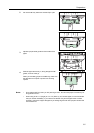
14 Main Power Indicator — This indicator lights red when the power switch is turned on ( | ).
15 Original Quality Key and Indicator — Press this key to light the indicator to select the original
quality. See page 4-2.
16 Original Size Key and Indicator — Press this key to light the indicator to select the size of the
original. For details, refer to the Advanced Operation Guide.
17 Exposure Key and Indicator — Press this key to light the indicator to change the exposure
setting.
18 Paper Select Key and Indicator — Press this key to light the indicator to switch paper feed
between the cassette(s) and the MP tray.
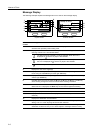
19 Message Display — Displays messages on how to operate the machine as well as when
trouble occurs. For details, refer to the following page.
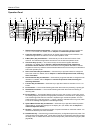
20 Left Select Key — Press this key when selectable items are displayed on the bottom line of the
message display and to select the left item. If you press this key while [Cancel] appears on the
message display, the display will return to the top screen for the menu that is currently being
set.
21 Right Select Key — Press this key when selectable items are displayed on the bottom line of
the message display and to select the right item.
22 Back Key — Press this key to go one level back (higher) in relation to the current menu.
23 W Key - Press this key to move the cursor in the message display to the left. Press this key as
well to verify, enter or delete an e-mail destination.
24 S Key — Press this key to move the cursor upward in the message display. When setting the
zoom ratio, registering a custom paper size, or making settings for one of the timers, use this
key to change the currently selected value to that desired. Holding down this key will allow you
to continuously change the selected value.
25 T Key — Press this key to move the cursor downward in the message display. When setting
the zoom ratio, registering a custom paper size, or making settings for one of the timers, use
this key to change the currently selected value to that desired. Holding down this key will allow
you to continuously change the selected value.
26 X Key — Press this key to move the cursor in the message display to the right.
27 Enter Key — Press this key as well during default settings in order to select the current default
item or register the currently displayed setting.
28 Stop/Clear Key — Press this key to stop scanning or copying.
29 Start Key and Indicator — Press this key to start copying or scanning. Copying or scanning,
as appropriate, will begin immediately if you press this key when the indicator is lit green.
† Initial mode is the state in which the machine enters after warm-up. If no operation is made on this machine
for a preset period of time, the machine will return to the initial mode. Be aware that any settings that are in
progress will be cleared. For details, refer to Chapter 5 in Advanced Operation Guide, Auto Panel Reset.