


Page 2-19INSTALLATION
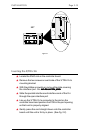
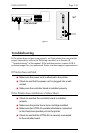
figure 2.5
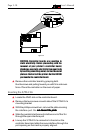
▲ Gently press the card straight down onto the controller
board until the unit is firmly in place. (See fig. 2.5)
CAUTION: DO NOT press the X/TRA XLi on to the
controller board at an angle, or interface pins
could be bent, damaging the unit and causing it
to not function properly.
▲ Align the screw holes on the mounting bracket of the XLi
with the notches on the interface port. Make sure the
mounting bracket is flush with the interface port.
▲ Fasten mounting screws to the printer through the
guiding holes on either side of the X/TRA XLi.
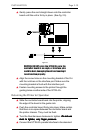
Returning the Printer to Operation
▲ Slide the controller board back into the printer, aligning
the edge of the board in the guide rails
▲ Push the controller board firmly into place. Make certain
that there is no space between the controller board and
the printer chassis. They must be flush.
▲ Turn the thumbscrews clockwise to tighten.
Do not useDo not use
Do not useDo not use
Do not use
tools to tighten, only finger pressuretools to tighten, only finger pressure
tools to tighten, only finger pressuretools to tighten, only finger pressure
tools to tighten, only finger pressure
.
▲ Connect the X/TRA XLi parallel interface to the standard