


E–28 Chapter 4: The Front Feeder
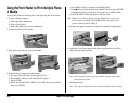
Using the Front Feeder to Print Multiple Pieces
of Media
To set up the printer for multiple-piece print jobs using the Front Feeder:
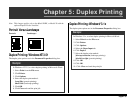
1. In your software program:
a. Enter the printer setup menu.
b. Select Front Feeder.
c. Select the media type, size and orientation.
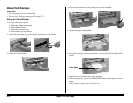
2. Lower the printer’s Front Feeder.
3. Flip out the tray, then pivot out the extender.
4. Enter the Level-1 menu and make changes:
a. Press the ON LINE button (printer goes off line).
b. Press MENU 1/Menu 2 until TRAY SELECT displays.
c. Press ENTER.
d. Make sure that MANUAL FEED is set to OFF (the factory default),
then press ENTER.
e. Press MENU 1/Menu 2 (display reads
PAPER FEED).
f. Press
ᮣ
/Reset until the display reads FRONT TRAY, then press ENTER
to engage the setting (an Asterisk will appear next to FRONT TRAY).
g. Press ON LINE to return the printer to on-line status.
Note: When you are done printing using the Front Feeder, reenter the
Level-1 menu and change the PAPER FEED setting back to its
former setting (normally TRAY 1).
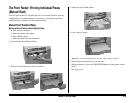
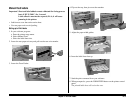
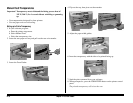
5. Open the rear paper exit path (not required for standard weight paper).
6. Adjust the Front Feeder paper width guides for the media you will be
using and load the print media.
Note: Insert letterhead paper face-up, with the top edge of the paper
nosed into the printer.
7. Send the print job.
Note: The software application will override the printer menu settings.