


Chapter 2 Installing CoreModule 800 Options
14 QuickStart Guide CoreModule 800
CAUTION To prevent damage to the CoreModule 800 or the SODIMM, do not touch
the either one until you have discharged yourself and have followed good
Electrostatic Discharge principals. The CoreModule 800 and the SODIMM
are sensitive to static electricity and can be easily damaged by improper
handling. Do the following when handling either one:
Use an anti-static wrist/ankle strap and a grounding mat connected to ground.
Before you touch the CoreModule 800 or SODIMM, touch a grounded,
unpainted metal surface to discharge any static electricity.
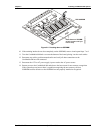
3. Disconnect any cables that would prevent you from turning the CoreModule 800 over exposing
the bottom of the board.
4. Turn the CoreModule 800 over to access the bottom of the board and lay it on a flat anti-static
surface. See Figures 2-1 and 2-2.
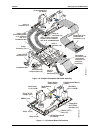
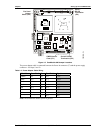
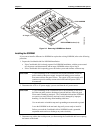
5. Locate the SODIMM socket (J22) on the bottom of the CoreModule 800. See Figure 2-1.
U18
U15
U16
U10
D7
U21
Q15
U25
D3
D2
D1
Q5
U6
F1
U22
Y3
Y2
Q7
L9
Q14
U4
J13
DDR
SODIMM
Retaining Latches (2)
DDR
SODIMM
Socket (J13)
CM800QkS_08a
Figure 2-1. CoreModule 800 SODIMM Location (Bottom view)
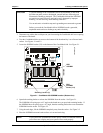
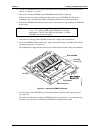
6. Open both retaining latches to release the SODIMM from the socket. See Figure 2-1.
The SODIMM will spring up to a 45° angle to the board once you open both retaining latches. If
the SODIMM does not spring up to a 45° angle, then the retaining latches have not released the
SODIMM from the socket. See Figure 2-2.
7. Using the card edges, lift the SODIMM completely away from the socket. See Figure 2-2.
8. Place the SODIMM on an anti-static surface or in an anti-static bag.
NOTE If you remove the SODIMM and restore power without a SODIMM installed,
you will not see a display and your system will not work properly.