


Chapter 5 : FRONT PANEL DISPLAY MENUS DESCRIPTION (continued) OCTO² / QFX402
PAGE 28
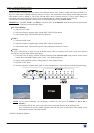
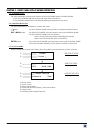
3[OUTPUT] + ENTER.
3-1 [Output status] + ENTER.
Indicates the status of the output.
3-2 [Output format] + ENTER.
Select one of the available output formats with + ENTER.
• [852x480 16/9]
• [800x600 4/3]
• [1280x720 16/9]
• [1024x768 4/3]
• [1280x768 16/9]
• [1366x768 16/9]
• [1280x1024 4/3]
• [1400x1050 4/3]
• [1920x1080 4/3]
• [1600x1200 4/3]
NOTE
: For fixed pixels display devices (DMD, LCD, PLASMA…), always select the output format
corresponding to the native resolution of the display device. Thus, the display device will not have to
scale the image and the result will be better.
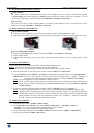
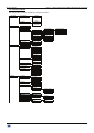
3-3 [Output rate] + ENTER.
• [50 Hz]: 50 Hz output frame rate
• [60 Hz]: 60 Hz output frame rate
• [72 Hz]: 72 Hz output frame rate
• [75 Hz]: 75 Hz output frame rate.
3-4 [Output sync] + ENTER.
Select the Output Sync. type with + ENTER.
• [H&V]: H & V Separate Sync.
• [COMP]: Composite Sync.
• [SOG]: Sync On green.
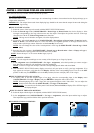
3-5 [Type of screen] + ENTER.
Select an item with + ENTER.
• [screen 4/3]: If your image is displayed on a 4/3 wall mounted projection screen shape.
• [screen 16/9]: If your image is displayed on a 16/9 wall mounted projection screen shape.
NOTE
: Available only in case of 4/3 output format.
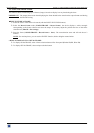
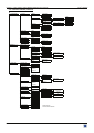
3-6 [Test pattern] + ENTER.
Select an item with + ENTER.
• [No pattern]: No test pattern is displayed.
• [Centering]: Displays onto the output a centering pattern (for position and size adjustments).
• [Color bar]: Displays onto the output a color bar pattern.
• [Grey scale]: Displays onto the output a grey scale pattern.
• [Grid]: Displays onto the output a grid pattern.
• [Burst]: Displays onto the output a burst pattern.