


QUICK START GUIDE - QUATTRO FX
ANALOG WAY EDITION : 11/06
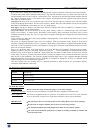
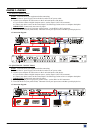
CONNECTIONS:
NOTE: Turn OFF all of your equipment before connecting.
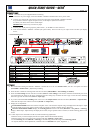
c Connect the AC power supply cord to the QFX402 and to an AC power outlet.
d Connect your computer & video sources to the 4 universal inputs of the QFX402.
• If you need to connect a digital computer source, use the input #1 (DVI-I IN connector).
• Connect your others sources to the unused inputs.
IMPORTANT:
Connect only one source by input.
e Connect your display device (projector, plasma screen...) to the HD15 or DVI connectors.
f Turn ON the QFX402 (rear panel switch). Then turn ON all your input sources and then your display device.
• Connection diagram:
2
4
12
3
3
ANALOG WAY
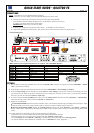
• HD15 connector pin assignment (inputs #2 to #4 - input #1 with a DVI/HD15 adaptor):
SIGNAL COMPUTER (analog) RGB/S VIDEO YUV & HDTV (analog) S.VIDEO (Y/C) COMPOSITE VIDEO
PIN 1 RED. RED. Cr / Pr. C (chrominance).
PIN 2 GREEN. GREEN. Y. Y (luminance). VIDEO (NTSC, PAL...)
PIN 3 BLUE. BLUE. Cb / Pb.
PIN 6 RED return. RED return. Cr / Pr return. C return.
PIN 7 GREEN return. GREEN return. Y return. Y return. return.
PIN 8 BLUE return. BLUE return. Cb / Pb return.
PIN 10 GND. GND.
PIN 13 H sync or C sync (S). C sync (S).
PIN 14 V sync.
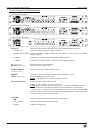
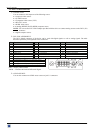
SETTINGS:
c We recommend resetting the QFX402 device to all of its default values, with the front panel LCD menu (CONTROL > default
value > yes) before proceeding.
d Select the fast or seamless switching mode with the LCD menu (SWITCHING > fast switching or seamless).
e Select the Auto settings function with the LCD menu (INPUT > Auto settings). This function will detect automatically the source
type connected to the inputs of the device. Sometimes, the auto setting may not detect the source type: in this case select manually
the source type with the LCD menu (INPUT > Input type).
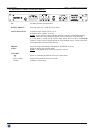
f If you have selected the fast switching mode: select one of the output formats with the LCD menu (OUTPUT > output format).
Then select the output rate with the LCD menu (OUTPUT > output rate).
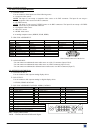
g Display device adjustment:
• IN SEAMLESS MODE: Select the reference computer source. The reference computer image is displayed onto the output. Adjust
directly the display device itself, using its position and size controls, to fill the computer image in full screen.
• IN FAST SWITCHING MODE: Display the centering pattern with the LCD menu (OUTPUT > test pattern > centering).
Display a black output. Adjust directly the display device itself, using its position and size controls, to fill the centering pattern in full
screen.
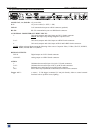
h For each input source connected to the device, make the following adjustments:
-Select the source you want to adjust (with the front panel "INPUT SELECTION" buttons).
-Select the aspect ratio of your input source with the LCD menu (IMAGE > aspect ratio).
-Use the Centering function (IMAGE > centering) to automatically position the image in the Centering pattern.
-As required, make the others adjustments, available in the LCD IMAGE menu (color, brightness…).
5
6
1
15
10
11