


iMac G5 (20-inch iSight) Troubleshooting — Symptom Charts 154
Turn on the computer by pressing the power button.8.
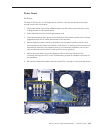
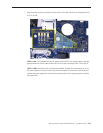
When the computer starts up, LED 2 will light, indicating the power supply is functioning 9.
properly. If LED 2 does not light, refer to the “No Power” troubleshooting earlier in this
chapter.
LED 3 will light last, indicating that the logic board and LCD assembly have communicated 10.
and the LCD is ready to receive video. Does LED 3 come on?
Yes: This indicates that your logic board is working correctly to produce video. Continue to
step 12.
No: Continue to step 11 to reset system power management.
Reset the SMU (System Management Unit). Refer to “Resetting the SMU” mentioned earlier in 11 .
this chapter. After resetting the SMU, did the video return?
Yes: Press and hold the power button until the computer powers o. Start the computer
again and conrm that the computer is functioning normally. Continue to step 14.
No: Go to the next step.
Connect an external display. Does the external display show an image? 12.
Yes: This indicates that the logic board video circuitry is functioning properly. Continue to
step 13.
No: This indicates that the logic board video circuitry may have failed. Replace the logic
board and retest.
Turn the display at an angle to you and look closely at the display. It may be necessary to 13 .
dim the room lights. Is the display completely black, or can you see a dim light or purple
glow to the display?
Completely black: Replace the inverter.
Dim light or purple glow: The inverter and LCD backlights are functioning. Replace the
display panel and continue to step 14.
Turn the machine o by holding the power button until the unit powers o. Unplug the 14.
computer and reinstall the EMI shield, front bezel, and access door. Return the computer to
the upright position. Plug in the computer again and power on the computer.
Does the computer have video now?
Yes: Restart the computer and make sure that the computer is operating properly.
No: Return to step 1 to verify system functionality.