


Chapter 2. Hardware Setup
21
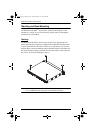
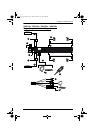
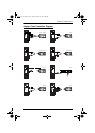
Single Stage Installation
In a single stage installation, there are no additional switches cascaded from the
KVM Over the NET
TM
switch. To set up a single stage installation, refer to the
installation diagrams starting on page 23 (the numbers in the diagram
correspond with the numbers of the instruction steps), and do the following:
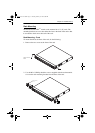
1. For the KN2124v, KN2140v, KN4124v and KN4140v, use the 5-in-1
Console Cable supplied with the package to connect your Local Console
devices to the unit.
For the KN2132, KN4116, and KN4132, plug your Local Console’s
keyboard, monitor, and mouse into the unit’s Console Ports. Each port is
color coded and marked with an appropriate icon.
Note: 1. You can use any combination of keyboard and mouse
connections. For example, you can use a PS/2 keyboard with a
USB mouse.
2. USB keyboards and mice can plug into the USB ports on the front
panel, as well as into the ports in the console port section.
3. The KVM Over the NET
TM
switch does not support distances that
exceed 20m between itself and the local monitor.
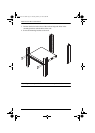
2. Use Cat 5e cable to connect any available KVM port to a KVM Adapter
Cable that is appropriate for the server you are installing (see the table on
page 8 for details).
Note: 1. If you are using a KA7120, KA7130, KA9120, KA9130, or
KA9131 Adapter Cable, refer to page 216 for mouse pointer
synchronization information.
2. If you are using a KA9131 Adapter Cable, refer to page 204 for
video and mouse adjustment information.
3. If you are using a KA7140 Adapter Cable, refer to page 214 for
setup and operation information.
4. The distance between the switch and the KVM Adapter Cable
must not exceed these lengths: KA7140: 300m; KA71xx: 50m;
KA91xx: 40m.
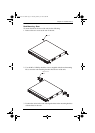
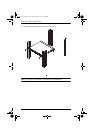
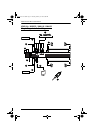
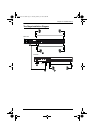
3. Plug the connectors on the KVM Adapter Cable into the appropriate ports
of the server you are installing. (See Adapter Cable Connection Diagram,
page 25.)
kn2124v-4132.book Page 21 Tuesday, January 12, 2010 5:08 PM