


Installation
30 ETEP Installation Guide
Rack Mount Installation
To mount the ETEP in a standard 19-inch equipment rack, have the following tools and materials
available:
• External power supply
• Two mounting brackets, supplied in the Accessory Kit
• (4) small black screws and (4) large #10-32 screws, supplied in the Accessory Kit
• #1 Phillips and #2 Phillips screwdrivers (user-supplied)
To install the ETEP in a rack:
1 Place the unit on a solid surface, with the bottom panel facing up.
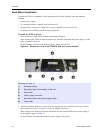
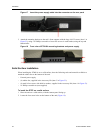
When looking at the ET0010A from the bottom rear, the bracket that holds the power supply is on the
right, as shown in Figure 14.
On the ET0010A, the bracket that holds the power supply is on the left.
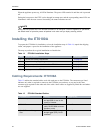
Figure 14 Bottom rear view of the ET0010A, with rack mount brackets
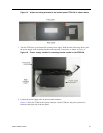
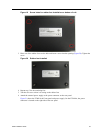
2 Attach the mounting brackets to each side of the unit using the four small black screws provided in
the Accessory Kit (item 2 in Figure 23), and a #1 Phillips screwdriver.
When looking at the ET0010A-402 from the bottom rear, the bracket that holds the power supply is
on the right, as shown in Figure 15.
On the ET0010A, the bracket that holds the power supply is on the left.
Elements of Figure 14:
1) Mounting bracket
2) Regulatory label on the bottom of the unit
3) Rear panel
4) Power supply connector
5) Mounting bracket with power supply cradle
6) Front panel