


48
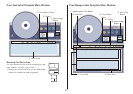
Free Design and Free Text Template Main Windows
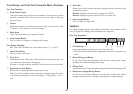
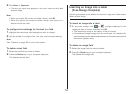
Free Text Template
1 Print Pattern Panel
This panel shows the location and orientation of the printing on the
currently selected label. Click this panel when you want to change
the text layout.
2 Toolbar
Contains a selection of useful editing tools. Click a tool to use it. See
“Toolbars” on the right for more information.
3 Work Area
This is the area where you layout the label.
4 Insert Image Button
Click to insert an image or a background image.
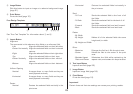
Free Design Template
See “Free Text Template” for information about 1, 2, and 3.
5 Insert Text Button
Click to insert a text field.
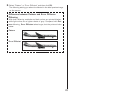
6 Print Area
Indicates the area within the work area that is actually printed. You
can move the print area by dragging it.
Any text or images that are outside of the print area are not printed.
7 Measurement Unit Button
Shows the currently selected measurement unit.
Each click of the measurement unit button cycles through the units
in the following sequence: mm (millimeters) → Pel (pixels) → inch →
mm.
8 Zoom Box
Select once of the following options to change the size of the work area
as described below.
Detailed: Displays the print area in actual size (100%).
Normal: Displays the print area as 62.5% its actual size.
9 Insert Image Button
Click to insert a image field.
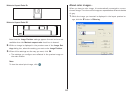
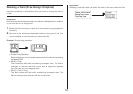
Toolbars
The following describes the tools that are available in the toolbars on the
Free Text and Free Design label template main windows.
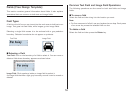
Free Text Templates
1 Font Settings
Use these settings to select the font, font size, etc.
• The font size you select here is displayed in the work area when you
print.
2 Show Background Button
On the Free Text label template main window, clicking this button
displays the selected background image.
3 Editing Tools
Use these tools to copy and paste selected text and fields (page 52).
4 Background Image Setting Button
On the Free Text label template main window, clicking this button
displays a dialog box for configuring background image settings.
1
2
3
4 5 6