


Chapter 3 Installing the Cisco Wide Area Application Engine
Installing the Cisco Wide Area Application Engine
3-6
Cisco Wide Area Application Engine 511 and 611 Hardware Installation Guide
OL-7220-02
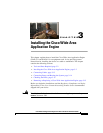
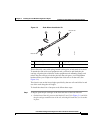
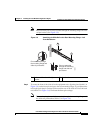
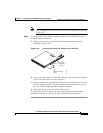
• On the rear of the rail, press on the two rear tabs, and slide the pin carriage toward
the front of the rail, releasing the latch tab as it catches in place. To prevent the
rail-adjustment bracket (labeled 1 in Figure 3-4) from moving during this step,
hold it in place with your thumb.
Note Slide rails are marked (RIGHT/FRONT and LEFT/FRONT) for proper
placement.
Figure 3-4 Opening the Spring-Loaded Pin Carriages—Left Slide Rail
Shown
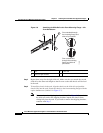
Step 2
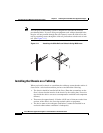
To adjust the length of the slide rail, lift the release tab (labeled 1 in Figure 3-5)
and fully extend the rail-adjustment bracket from the rear of the slide rail until it
snaps into place.
Step 3 To secure the slide rail to the equipment rack, align the pins on the rear of the slide
rail with the holes on the rear mounting flange. Press the latch tab (labeled 2 in
Figure 3-5) to release the pin carriage.
1 Rail-adjustment bracket 2 Latch tab
3 Slider tab 4 Pin carriage
4
3
2
1