


Chapter 4 Installing Hardware Options
Installing Adapters
4-10
Cisco Wide Area Application Engine 511 and 611 Hardware Installation Guide
OL-7220-02
Installing the Fibre Channel Adapter
To install the Fibre Channel adapter, follow these steps:
Step 1 Check the system board and locate the correct PCI-X slot for the Fibre Channel
card.
Step 2 Power down any connected peripheral devices, and then power down the device.
Step 3 Disconnect the power cords.
Step 4 Remove the cover. (See the “Removing the Cover and Bezel” section on
page 4-1.)
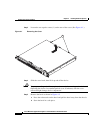
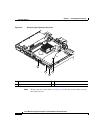
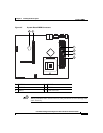
Step 5 Remove the expansion slot cover. (See Figure 4-3.)
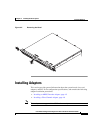
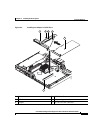
Step 6 Align the adapter with the slot 2 connector on the riser card. Carefully press the
adapter into the expansion slot until it is fully seated and secure. (See Figure 4-4.)
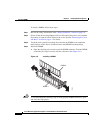
Step 7 Reinstall the riser card. Make sure that the riser card is fully seated in the riser
card connector on the system board.
Step 8 Connect one end of an LC-LC Fibre Channel cable to the optical interface
connector on the Fibre Channel adapter card. Connect the other end to a Fibre
Channel device.
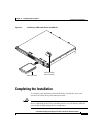
Step 9 Carefully install and secure the cover. (See the “Completing the Installation”
section on page 4-17.)
Step 10 Connect the power cables.
Step 11 Power on all external Fibre Channel devices; then power on the device.
Step 12 Verify the installation by checking the LEDs. (See Table 1-4 on page 1-9.)
Troubleshooting the Fibre Channel Adapter Installation
Three types of adapter installation problems might cause your Fibre Channel
adapter to function incorrectly:
• Hardware problems
• System configuration problems
• Fibre Channel problems