


Chapter 6 Cabling the Line Ports and Completing the Installation
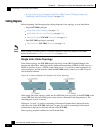
Installing a Cascaded System
Cisco SCE 2000 4xGBE Installation and Configuration Guide
6-10 OL-7824-04
Again, auto-negotiation for bump-in-the-wire topology may be enabled or disabled. For receive-
only topologies, using an external splitter, auto-negotiation must be disabled.
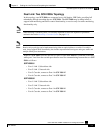
To view the Gigabit Ethernet counters, complete the following steps:
Step 1 At the SCE 2000# prompt, type show interface GigabitEthernet 0/interface-number
counters.
This displays the GigabitEthernet counters. This command enables you to verify that traffic is
taking place. You can see that the counters increase, together with the increased number of
packets that flow through the SCE 2000.
Again, in bump-in-the-wire topology, both the Rx and Tx counters apply as traffic monitors. For
receive-only topologies, using an external splitter, only the Rx counters apply.
EXAMPLE:
The following example shows the counters of the first Gigabit Ethernet interface.
SCE 2000#show interface GigabitEthernet 0/1 counters
In total octets: 100
In good unicast packets: 90
In good multicast packets: 0
In good broadcast packets: 10
In packets discarded: 0
In packets with CRC/Alignment error: 0
In undersized packets: 0
In oversized packets: 0
Out total octets: 93*2^32+1022342538
Out unicast packets: 858086051
Out non unicast packets: 0
Out packets discarded: 0
You are now ready to continue to the next stage, loading and activating an SCE application.
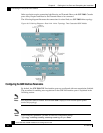
Installing a Cascaded System
This section outlines the installation procedures for a redundant solution with two cascaded SCE
2000 platforms. Refer to the Cisco Service Control Engine (SCE) CLI Command Reference for
details of the CLI commands.
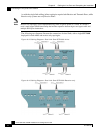
Warning
When working with two SCE 2000 platforms with split-flow and redundancy, it is extremely important
to follow this installation procedure.
To install a cascaded system, complete the following steps:
Step 1 Install both SCE 2000 platforms, power them up, and perform the initial system configuration.
(See Installation and Maintenance (on page 4-1) and Connecting the Management Interfaces and
Performing Initial System Configuration (on page 5-1).)