


Chapter 4: Using the Printer30
A760 Two-Color Thermal/Impact Hybrid Printer: User Guide 189-9200303 Rev. D A760-D100 10/04
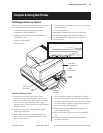
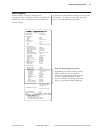
Printer configurations
Printers are shipped with all the functions and parameters pre-set at the factory. Settings for
various printer parameters can be changed. This menu is printed on the receipt and scrolls through
instructions for selecting and changing user changeable functions or parameters.
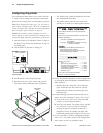
Note: When changing the paper type, you will need to
either send the “Set paper type” (1D 81 m n) command
or use the “Set Paper Types” selection from the
configuration menu. See paper types available on
page 48.
Caution:Be extremely careful changing any of the printer
settings to avoid inadvertently changing other settings that
might affect the performance of the printer.
The following functions and parameters can be changed in
the scrolling configuration menu (*except as noted):
• Communication Interface
RS-232C serial interface (9-pin)
RS-232C serial interface (25-pin)
Universal serial bus (USB)
IEEE 1284 parallel
Ethernet (*cannot be set -see next page)
• RS-232C serial interface settings
Baud rate
Data bits (*can not be changed)
Stop bits (*can not be changed)
Parity (*can not be changed)
Hardware (DTR/DSR) or software (XON/XOFF)
flow control
Data reception errors
Alternate DTR/DSR
• Diagnostic Modes
Normal
Datascope
Receipt test
Slip test
MICR test
Check flip test
• Printer Emulations
A760 native mode
A756 emulation
A758 emulation
• Printer settings and functions
Emulation/software option sub-menu
Printer ID mode
Default lines per inch
Carriage return usage
Default font
Font size
Slip position (MICR printers)
Slip eject at receipt select
Hardware options sub-menu
Printhead setting
Paper type name
Color density
Print density (mono)
Power supply wattage (max power)
Alternate reset feature
Knife option
Paper low sensor
MICR option
MICR dual pass option
Check flip option
For more information about See this section
Using the configuration “Configuring the printer”
menu to configure the on page 32.
printer