


Setting Up a Home and Office Network 97
NOTE: Network security
settings are only provided
by your network
administrator and are
unique to your network.
Dell cannot provide this
information.
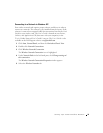
Connecting to a Network with no Security-Related Requirements
1 In the Preferred networks area, click the name of your wireless
network.
2 Click Properties.
3 From the Network Authentication drop-down menu, select Open.
Earlier versions of the Dell wireless software may not contain the
drop-down menus. If you are using an earlier version, de-select the
Data encryption (WEP enabled) check box and go to
step 5.
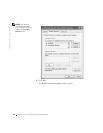
4 From the Data encryption drop-down menu, select Disabled.
NOTE: Your computer
may take up to a minute
to attach to the network.
5 Click OK.
Your network setup is complete.
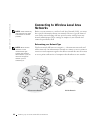
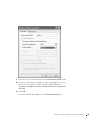
Connecting to a Network with Wi-Fi Protected Access (WPA) Security
Requirements
The following instructions are basic steps for connecting to a WPA network.
If your network requires a user name, password, or domain-settings, consult
the setup instructions in the User’s Guide for your wireless network card.
NOTE: WPA protocols
require that you know the
Network Authentication
and Data Encryption
settings for your wireless
network. In addition, your
WPA-protected network
may require special
settings such as a network
key, user name, password,
and domain name. Be
sure to get all necessary
WPA settings from your
network administrator
before continuing.
1
In the Preferred networks section, click the name of your wireless
network.
2 Click Properties.
3 From the Network Authentication drop-down menu, select your
network authentication type (as provided by the network
administrator).
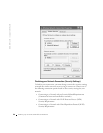
If you do not see the drop-down menus, you must update your wireless
software before continuing. Download and install the latest version of
your wireless driver software from the Dell Support website at
support.dell.com.