support.dell.com Checking Inside Your Computer 5-1
CHAPTER 5
Checking Inside Your Computer
This chapter describes troubleshooting procedures for expansion cards and system
memory. Some procedures require you to access the inside of the computer and
remove and reinstall components. Procedures are also included for checking a wet or
damaged computer.
CAUTION: Before completing any of the procedures in this chapter, be sure
to follow the procedures in “Safety First—For You and Your Computer” in
Chapter 2.
Expansion Cards
If an error message indicates an expansion-card problem or if an expansion card
seems to perform incorrectly or not at all, the problem could be a faulty connection, a
conflict with software or other hardware, or a faulty expansion card. If software prob-
lems and conflicts have been eliminated, perform the following general steps to
troubleshoot expansion cards:
1. Remove the computer cover as described in “Removing and Replacing the
Computer Cover” in Chapter 2.
2. Remove the riser-board bracket as described in “Removing and Replacing the
Riser-Board Bracket” in Chapter 2.
3. Remove all of the internal and external cables attached to the expansion cards.
4. Remove the expansion cards as described in “Removing Expansion Cards” in
Chapter 2. Then reinstall the expansion cards, fully seating the cards in their
connectors.
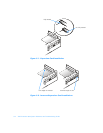
Figure 5-1 illustrates a correctly seated expansion card, and Figure 5-2 illustrates
incorrect expansion-card installations.
5. Reconnect the cable connectors to the appropriate connectors on the expansion
cards.
6. Replace the riser-board bracket.
7. Replace the computer cover, connect all external cables, and turn on the system.


