


Back to Contents Page
Dell™Optiplex™960MiniTower/Desktop/SmallFormFactorServiceManual
Processor
Processor
Removing the Processor
1. Perform the procedure Before Working on Your Computer.
2. Remove the hard drive shroud assembly (see Removing the Hard Drive and Shroud Assembly).
3. Remove the optical drive (see Removing an Optical Drive).
4. If an internal wireless card is installed, unplug the card from the system board and move it and the wireless card cable away from the fan shroud (see
Internal Wireless Card - Removal).
5. Remove all cables routed through guides on the fan shroud.
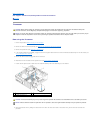
6. Disconnect the two fan cables from the system board (see System Board Components).
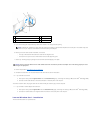
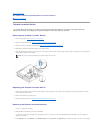
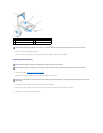
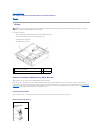
7. Loosen the two captive screw on each side of the heatsink assembly and lift the assembly out of the chassis.
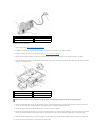
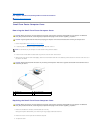
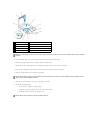
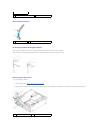
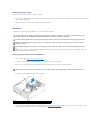
8. Open the processor cover by sliding the release lever from under the center cover latch on the socket. Then, pull the lever back to release the
processor.
CAUTION: Before working inside your computer, read the safety information that shipped with your computer. For additional safety best
practices information, see the Regulatory Compliance Homepage at www.dell.com/regulatory_compliance.
NOTICE: To prevent static damage to components inside your computer, discharge static electricity from your body before you touch any of your
computer's electronic components. You can do so by touching an unpainted metal surface on the computer chassis.
1
heatsink assembly
2
captive screw housing (4)
3
fan cable connectors (2)
CAUTION: The heatsink assembly may be very hot during normal operation. Be sure that it has had sufficient time to cool before you touch it.
NOTICE: Unless a different heatsink is required for the new processor, reuse the original heatsink assembly after you replace the processor.