


Back to Contents Page
Dell™Optiplex™960MiniTower/Desktop/SmallFormFactorServiceManual
Processor
Processor
Removing the Heatsink Assembly
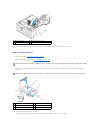
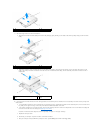
1. If cables are routed through the cable guides on the top or sides of the heatsink shroud, detach them and move them away from the heatsink
assembly.
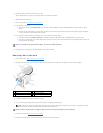
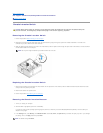
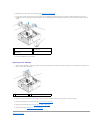
2. Loosen the two captive screws, one on the upper and one on the lower sides of the heatsink assembly.
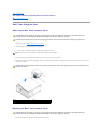
3. Rotate the heatsink assembly upward from the front edge, and remove it from the computer.
Lay the heatsink assembly upside down to avoid contaminating the thermal solution.
Replacing the Heatsink Assembly
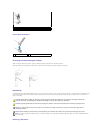
1. Clean the thermal solution from the bottom of the heatsink.
2. Apply the new thermal solution to the top of the processor as needed.
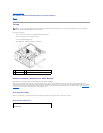
3. Install the heatsink assembly:
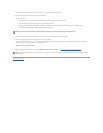
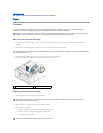
a. Place the heatsink assembly back onto the heat-sink assembly bracket.
b. Rotate the heatsink assembly down towards the computer base.
c. Tighten the two captive screws.
CAUTION: Before working inside your computer, read the safety information that shipped with your computer. For additional safety best
practices information, see the Regulatory Compliance Homepage at www.dell.com/regulatory_compliance.
NOTICE: To prevent static damage to components inside your computer, discharge static electricity from your body before you touch any of your
computer's electronic components. You can do so by touching an unpainted metal surface on the computer chassis.
CAUTION: Despite having a plastic shield, the heatsink assembly may be very hot during normal operation. Be sure that it has had sufficient time
to cool before you touch it.
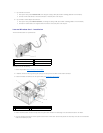
1
heatsink assembly
2
captive screw (2)
NOTICE: Ensure that you apply new thermal solution. New thermal solution is critical for ensuring adequate thermal bonding, which is a
requirement for optimal processor operation.
NOTICE: Ensure that the heatsink assembly is correctly seated and secure.