


Dell
™
Latitude™ E6400 XFR Service Manual
Page 57
20. Replace the display assembly, LCD cable channel covers and bottom access panel (see Replacing the Display
Assembly).
21. Follow the procedures in After Working On Your Computer
.
22. At first power on, the AMT provisioning menu appears. See the instructions in the tech sheet that was
shipped with your replacement system board.
23. Enter the system setup program to update the BIOS on the new system board with the computer Service Tag.
For information on the system setup program, see the ™ Technology Guide on your computer or at
support.dell.com.
24. Run the SetXFR utility to allow the system board to operate as an E6400 XFR computer. See the instructions
in the tech sheet that was shipped with your replacement system board.
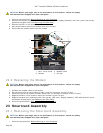
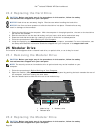
27 Card Cage
27.1 Removing the Card Cage
CAUTION: Before you begin any of the procedures in this section, follow the safety
instructions that shipped with your computer.
1. Follow the procedures in Before Working on Your Computer
.
2. Remove any PC-card or Express-card inserted.
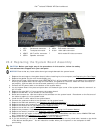
3. Remove the system board (see Removing the System Board
).
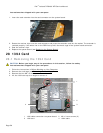
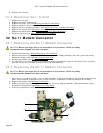
4. Slide the scribe under the cage then press outward to unhook the clips on both sides of the cage housing.
NOTE: Do NOT remove the two screws on the upper back corners of the card cage. They are
used for retaining the card cage to the card extender board.
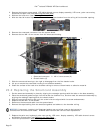
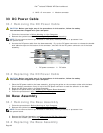
5. Detach the card extender board from the card socket by lifting the detached clips to clear the card socket and
sliding the card cage from the card socket.
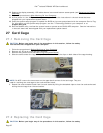
27.2 Replacing the Card Cage
CAUTION: Before you begin any of the procedures in this section, follow the safety