


Removing and Replacing Parts on the Midsize Chassis 5-23
2. Turn off power to all peripherals, and disconnect the AC power cable from
its electrical outlet.
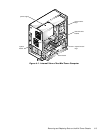
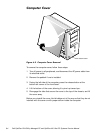
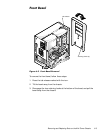
3. Remove the computer cover.
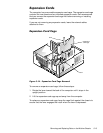
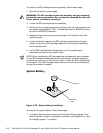
4. Remove the expansion-card cage, and locate the battery in the front-right
corner of the system board adjacent to the DIMM connectors.
&$87,21,I\RXSU\RXWWKHED WWHU\ZLWKDEOXQWREMHFWEHFDUHIXO
QRWWRWRXFKWKHV\VWHPERDUGZLWKWKHREMHFW(QVXUHWKDWWKHREMHFW
LVLQVHUWHGE HWZHHQWKH EDWWH U\DQGWKHVRFNH W EHIRUHDWWH PSWLQ J WR
SU\RXWWKHEDWW HU\2 WKHUZ LVH\RXPD\GDPDJHWKHV\VW HPERDUGE\
SU\LQJRIIWKHVRFNHWRUE \EUHDNLQJWUDFHVRQWKHV\VWHPERDUG
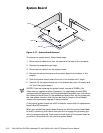
5. Remove the battery by carefully prying it out of its socket with your fingers
or with a blunt, nonconducting object, such as a plastic screwdriver.
6. Insert the battery into the socket (with the positive side labeled “+” facing
upwards), and snap it into place.
7. Replace the expansion-card cage; replace the computer cover, reconnect
all cabling, and reboot the system.
8. Enter the System Setup program, and configure the system using the infor-
mation from the printouts you made earlier.
9. Turn off the computer; wait 10 or more minutes, and then reenter the Sys-
tem Setup program to ensure that the date and time are still correct,
indicating that the system battery is functioning correctly.
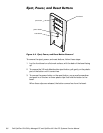
:$51,1*
7KHUHLVDGDQJHURIWKHQHZEDWWHU\H[SORGLQJLILWLVLQFRUUHFWO\
LQVWDOOHG:KHQ\RXUHSODFHWKHV\VWHPEDWWHU\RULHQWWKHQHZEDW
WHU\ZLWKWKH´µIDFLQJX SVHH)LJXUH 5HSODFHWKHED WWHU\
RQO\ZLW KWKHVDPHRUHTXLYDOHQWW\SHUHFRPPHQGHGE\WKHPDQX
IDFWXUHU 'LVFDUG XVHG EDWWHULHV DFFRUGLQJ WR WKH PDQXIDFWXUHU·V
LQVWUXFWLRQV