


6-2
'HOO2SWL3OH[*;*;S0DQDJHG3&DQG2SWL3OH[1;1HW3&6\VWHPV6HUYLFH0DQXDO
:$51,1*)25<2853(5621$/6$)(7<$1'3527(&7,212)7+(
(48,30(17
%HIRUH\RXVWDUWWRZRUNRQWKHV\VWHPSHUIRUPWKHIROORZLQJVWHSV
LQWKHVHTXHQFHOLVWHG
1. Turn off the computer and any attached peripherals.
2. Disconnect the computer and any attached peripherals from their
power sources to reduce the potential for personal injury. Also, dis-
connect any telephone or telecommunication lines from the
computer.
3. Wait 5 seconds after powering down the computer before
disconnecting a peripheral from the computer or removing a compo-
nent from the computer’s system board to avoid possible damage to
the system board.
:HDUDZULVWJURXQGLQJVWUDSDQGFOLSLWWRDQXQSDLQWHGPHWDOVXU
IDFHVXFKDVWKHSDGORFNORRSRQWKHEDFNRIWKHFKDVVLV,IDZULVW
JURXQGLQJVWUDSLVQRWDYD LODEOHSHULRGLFDOO\WRXFKDQXQ SDLQWHG
PHWDOVXUIDFHRQWKHEDFNRIWKHFRP SXWHUWRGLVFKDUJHDQ\VWDWLF
FKDUJHIURP\RXUERG\$YRLGWRXFKLQJFRPSRQHQWVDQGFRQWDFWVRQ
DFDUGDQGDYRLGWRXFKLQJSLQVRQDFKLSWRSUHYHQWVWDWLFHOHFWULFLW\
GDPDJH
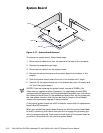
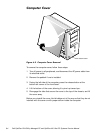
,QVLGHWKH&RPSXWHU
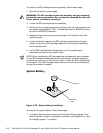
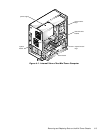
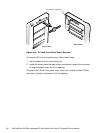
Figure 6-1 shows an internal view of the interior of the mini tower computer
and identifies major components for orientation. Refer to this illustration, as
needed, when performing the component removal/replacement procedures in
this chapter.