


21
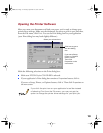
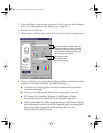
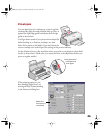
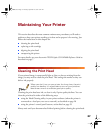
3. Click Custom, and then click the Advanced button. You see the Advanced dialog
box:
4. Check the Media Type and Ink settings. These settings are the same as the ones
you selected on the Main dialog box. You can change them here as you customize
your settings, if needed.
5. Choose a Print Quality setting.
6. Select a color management system (the availability depends on your operating
system).
After you customize your print settings for a special project,
you can save them as a group. Then you can reuse them
whenever you print a similar project. Click Save Settings in the
Advanced dialog box. Type a name for your setting group and
click OK.
7. Select any other settings you need to change.
8. Click OK to return to your application’s Print dialog box.
9. Click OK (or Print, depending on your application) to start printing.
For more information about the settings described in this section, see your electronic
EPSON Stylus COLOR 660 Reference Guide.
Some of these
options are
automatically
set or disabled
by other
settings you
choose
Click here to
change your
Print Quality
(resolution)
Changes
depending on
the Color
Management
setting selected
above
basics.book Page 21 Thursday, September 23, 1999 10:42 AM