


3-16 Capturing Images From Within Applications
In addition to the calibration profiles provided with the
Scanning Utilities, you can create your own calibration profiles
for any output device you use. For more information, see
Chapter 2.
Note:
The scanner uses the calibration profile you select only when the Pixel
Depth is set to 8 Color, 256 Color, or 16 Million Colors, and the
Scanning Sequence is set to 1 pass. For more information on the Pixel
Depth and Scanning Sequence settings, see “Modifying an Image Type”
on page 3-7.
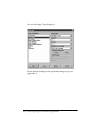
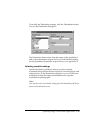
Saving and deleting a destination
To modify an existing destination, select it from the Destination
Name menu and change the necessary settings. Click Save and
then click OK.
To add a new Destination, select an existing one with similar
settings to the one you want to create. Then delete the existing
name from the Destination Name field and type a new name.
Change the displayed Destination settings and click Save; then
click OK.
Note:
If you don’t click Save before you click OK, the Destination settings are
not changed.
To delete an existing destination, select it from the Destination
Name menu and click Delete; then click OK.
Previewing and Adjusting the Image
Once you have selected the Image Type and Destination
settings, you can preview and adjust your image before you scan
it. (To use the special effects features available on the advanced
screen, see Chapter 4.)