


Installing an Interface
Before installing an interface, you must remove the printer’s cover,
WARNING
Do not remove the cover unless the printer is turned OFF because high
voltages are present inside the printer when the power is on. Also do
not touch contacts on the circuit board of the printer because many of
the components can be destroyed by the static electricity charge that
may build up on your
body
1.
Jrn off the power to both the printer and the computer and unplug
the power cable and disconnect the interface cable from the printer.
2. Remove the dust cover and paper guide.
3. Remove the automatic sheet feeder if one is installed.
4. Remove the option compartment cover and any optional cartridges
you have installed.
5. Remove the ribbon and move the print head to the middle of the
printer.
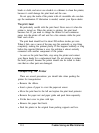
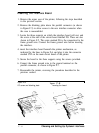
6. Remove the screws holding the upper case of the printer (shown in
Figure F-1), using a cross-head type screwdriver,
Figure F-1.
’
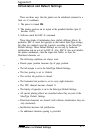
Figure F-2.
Removing the screux
U-dipping the control panel
F-4
Choosing and Setting Up
Optional
Interfaces