


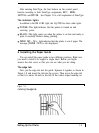

Some parallel cables have a ground wire. Connect this wire to the
ground screw on the printer to protect data from interference. Then
plug the other end of the cable into the computer and connect the
ground wire on the computer end of the cable if it has one.
Parallel interfaces require no further adjustment.
The serial interface
For the serial interface, you should use an Epson serial interface
cable. Use #8239 for the Apple
®
IIc, #8297 for the IBM@ PC and
compatibles, and #8293 for most other computers with a DB-25 socket,
including the Apple IIe with serial interface. (Although you can use the
serial interface with an IBM or compatible computer, it is usually best to
connect the LQ-2500 to the parallel port of an IBM or compatible
computer.)
The serial interface also requires that you change the SelecType
Interface setting under *Change Defaults, as well as two other settings,
Baud Rate and Parity See the next chapter on SelecType for more
information.
10 A Final Checklist
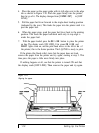
Now that you’ve completed the basic setup and self test, your
LQ-2500 is readv to print. If you’ve had any difficulties so far, run down
this brief checklist to be sure the printer is properly set up.
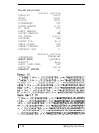
Were you able to run the self test successfully? If not, try reloading
the paper, and check that all packing materials have been removed
from the printer
Is the power source (power strip, etc.) turned on?
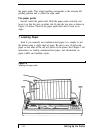
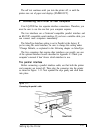
Is the ribbon properly installed? Check that the tab on the ribbon
cartridge is resting on the support ridge on the carriage. Make sure
the pins on the cartridge are in the holes on the carriage.
Before loading continuous-feed paper, read Chapter 3.
1-16
Setting
Up the Printer